SchoolEye Admin — Getting Started Guide
Set up your school on SchoolEye Live: sign in, add rooms, connect cameras, add parents and go live.
About this guide
This guide walks you through everything a school administrator does to get SchoolEye Live running, one screen at a time. Follow the steps in order and compare each screen with the picture in the guide.
- Red numbered circles in the pictures (1 2 3 …) match the numbered instructions next to them.
- The sample school in the pictures, Greenfield Public School, and every name, email address and phone number shown are fictional. Your screens will show your own school's details.
- Putting the cameras online needs a small program on a school computer. That part has its own guide: SchoolEye Agent for Windows — Installation Guide. This guide tells you exactly when to switch to it.
Note: What you can see and change depends on your role (Super Admin, Admin, Staff or Viewer). If a menu item or button described here is missing on your screen, see "Step 2.2" for what each role can do.
Before you begin
Have these ready. You do not need anything technical.
| You need | Why |
|---|---|
| The sign-in link, your email address and a temporary password | SchoolEye sends these to the person named as the school's Super Admin when your school is created. |
| A smartphone with an authenticator app (Microsoft Authenticator or Google Authenticator — both free) | SchoolEye asks for a 6-digit code from your phone every time you sign in. |
| A computer with an up-to-date web browser (Chrome, Edge, Firefox or Safari) | To use the admin website. |
| Pen and paper, or a password manager | To keep your ten recovery codes safe. |
| Your class list in a spreadsheet (student names, class, parent email or phone) | To let parents in (Part 4). |
| One Windows computer at school that stays on during school hours, and the CCTV recorder details | For the cameras (Part 3 and the Agent installation guide). |
| Consent from each class teacher whose classroom will be visible to parents | SchoolEye will not turn a room on without it (Step 3.5). |
The set-up at a glance
| Part | What you do | Time |
|---|---|---|
| 1 | Sign in and secure your account | 10 min |
| 2 | Set up your school: profile, other administrators, rooms | 15 min |
| 3 | Connect the cameras and link them to rooms | 45 min |
| 4 | Add the parents (import the class list) | 20 min |
| 5 | Set viewing hours and turn rooms on | 10 min |
| 6 | Getting help, troubleshooting, checklist | — |
Part 1 — Sign in and secure your account
Step 1.1 — Sign in
- Open the sign-in link that SchoolEye sent you. You will see the page below.
- Type your email address 1 and your temporary password 2 exactly as you were given them.
- Click Continue 3.
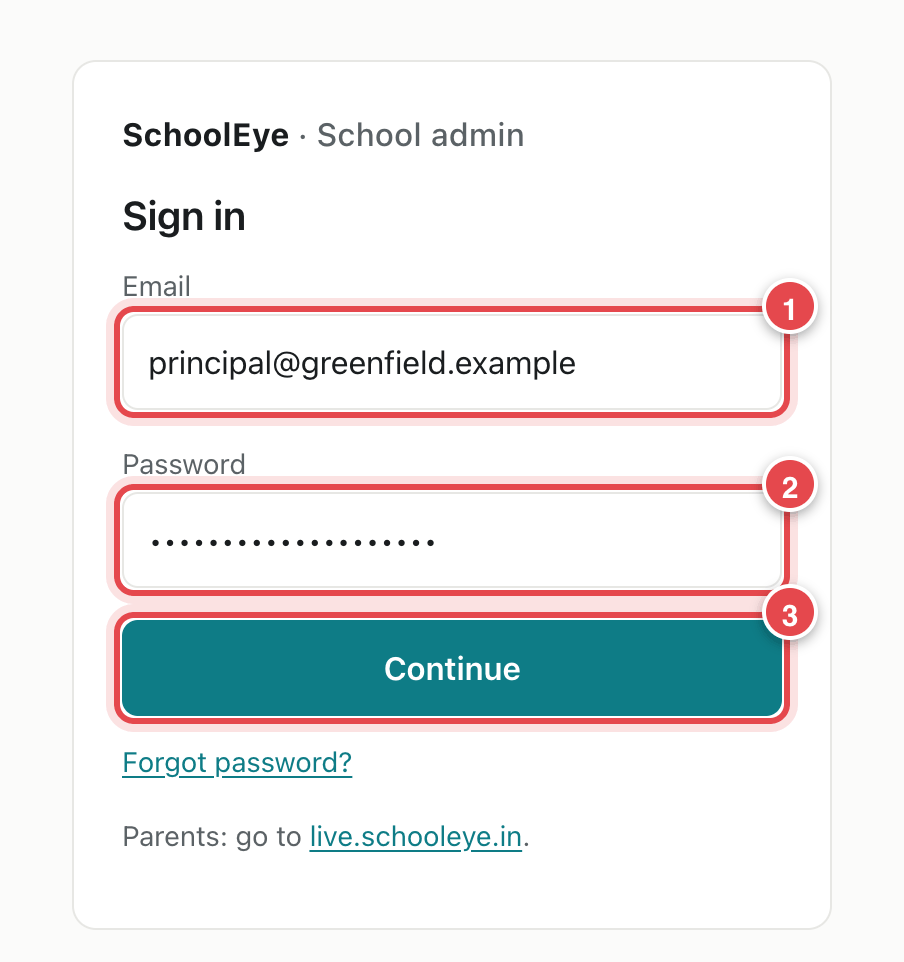
Note: This page is for school staff. Parents use a different website (see Step 5.4). If you cannot remember your password, use Forgot password? — see Step 1.6.
Step 1.2 — Set up two-step verification (first sign-in only)
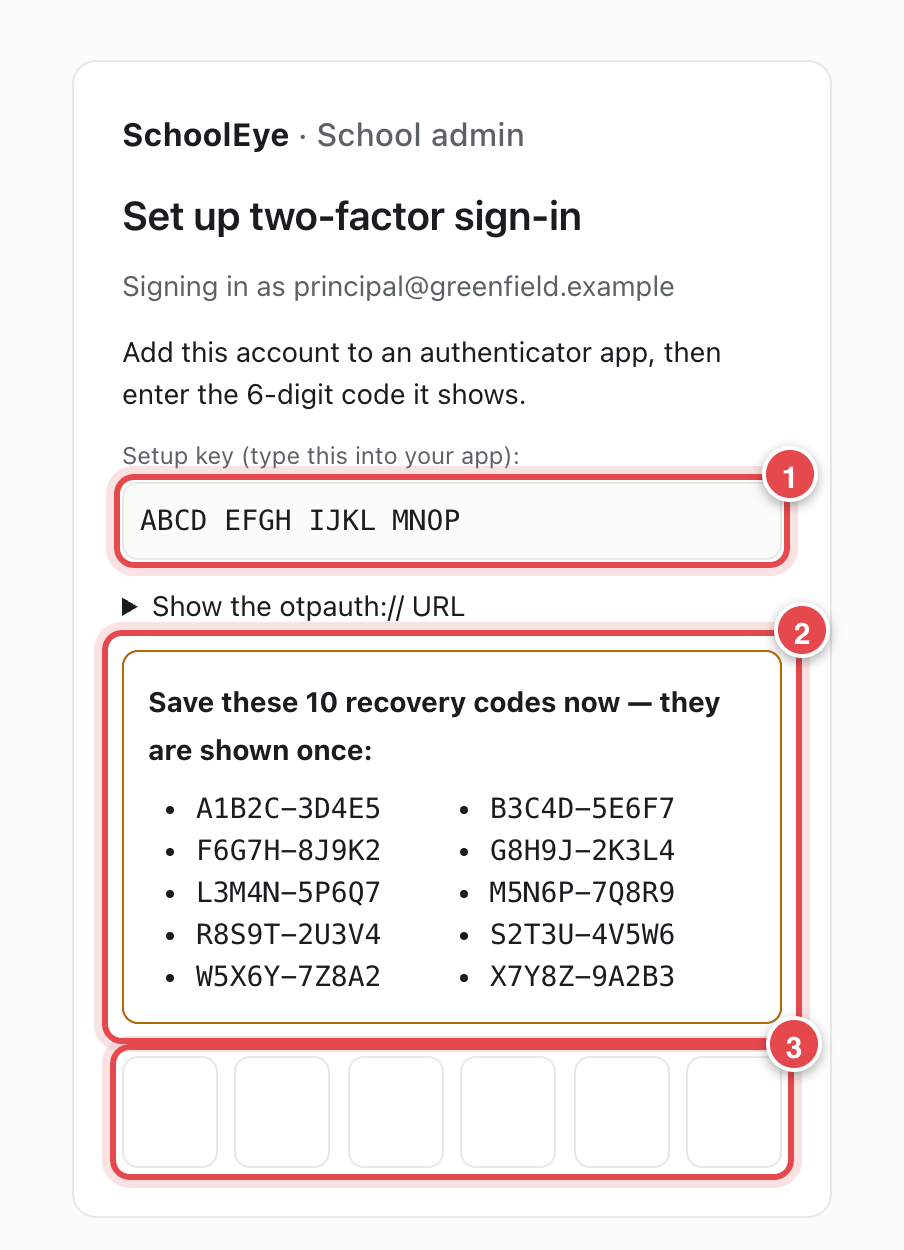
To keep children's data safe, SchoolEye asks every administrator for a second check: a 6-digit code from an app on your phone. You set this up once, on your first sign-in. After you click Continue, this page appears:
On your phone
- Open your authenticator app and add a new account:
- Microsoft Authenticator: tap +, choose Other account (Google, Facebook, etc.), then choose Or enter code manually.
- Google Authenticator: tap +, then Enter a setup key.
- Account name: type your email address. Your key: type the Setup key shown at 1 on the screen. Spaces do not matter. If asked, the key type is Time-based.
- The app now shows a 6-digit code that changes every 30 seconds.
Important: In Microsoft Authenticator, do not choose "Personal account" or "Work or school account". Those ask for a Microsoft password and will fail with "Your account or password is incorrect". Always choose Other account.
On the computer
- Copy the ten recovery codes shown at 2 onto paper or into a password manager. They are shown only once.
- Type the current 6-digit code from your phone into the six boxes at 3. The page moves on by itself.
Important: Recovery codes are your way back in if you lose your phone. Each one works once. Keep them somewhere private and safe — not in an email, a WhatsApp message or a photo on a shared phone.
Tip: There is no QR code on this page — use the setup key. If the code is rejected, wait for the next code and try again. Also check that your phone's date and time are set to automatic.
Step 1.3 — Find your way around the dashboard
When the code is accepted you arrive at the Dashboard.
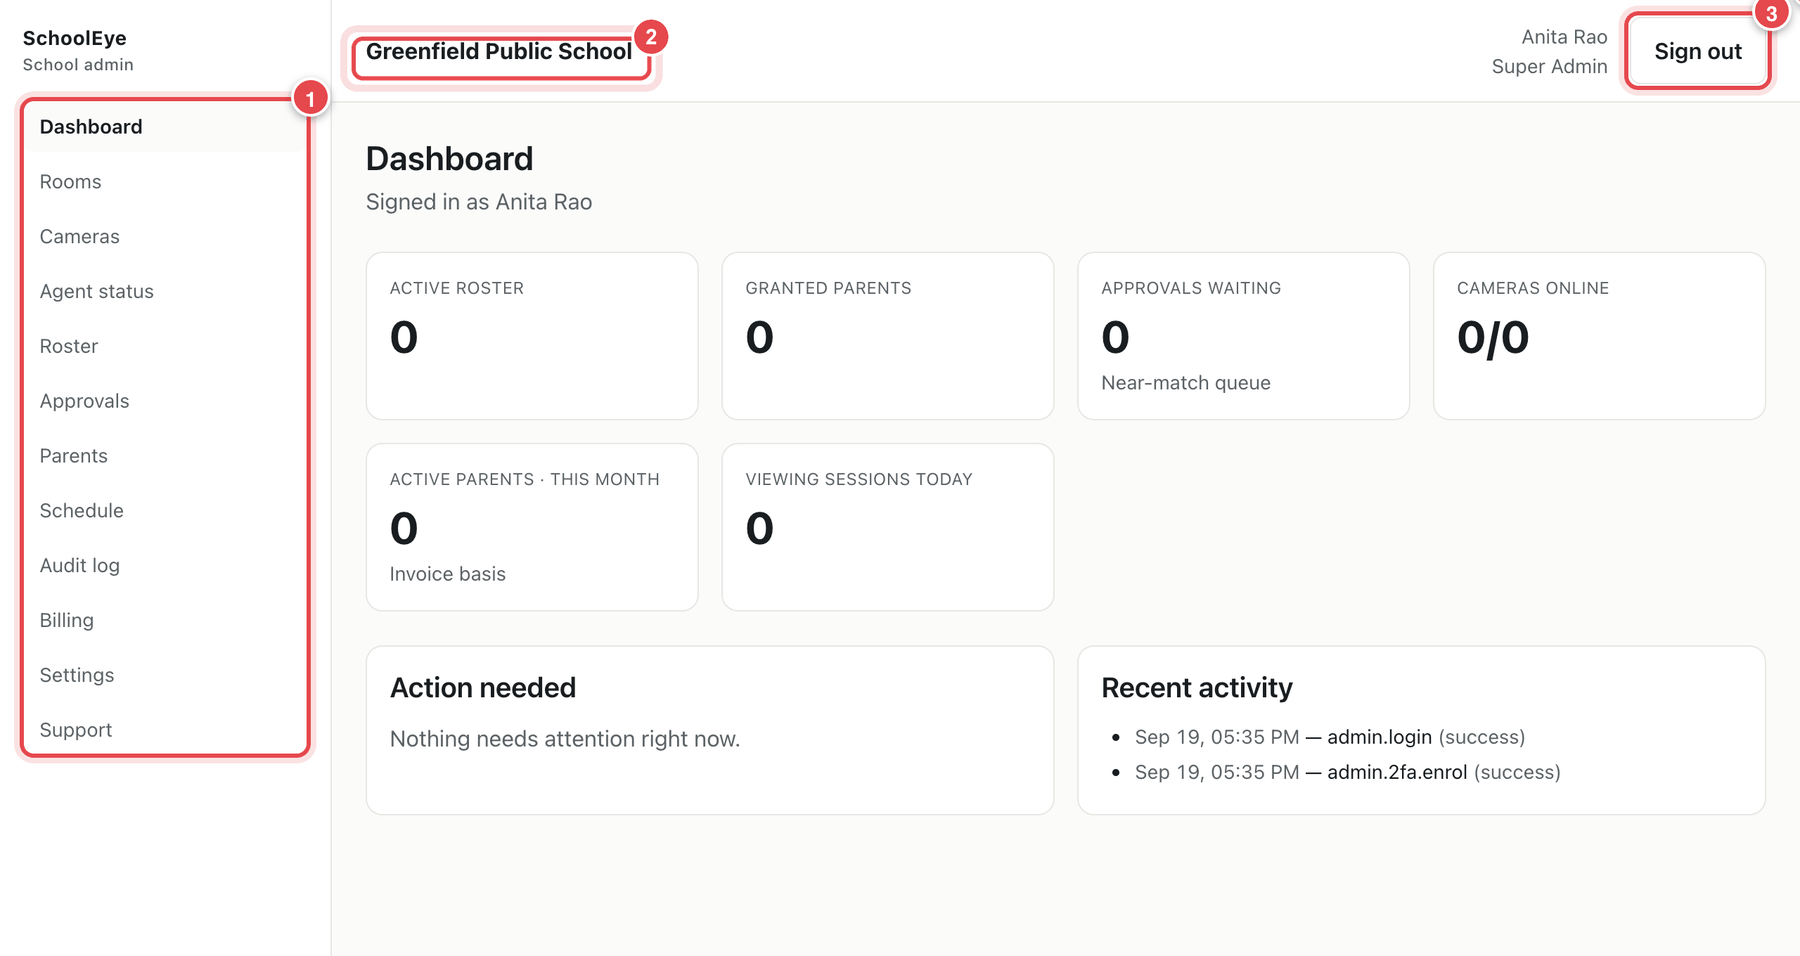
- 1 The menu on the left takes you to every area of SchoolEye.
- 2 The name of your school. Your own name and role are at the top right.
- 3 Sign out — always use this when you finish on a shared computer.
| Menu item | What it is for |
|---|---|
| Dashboard | Summary numbers: class list size, parents with access, approvals waiting, cameras online. |
| Rooms | Add rooms, link a camera, record teacher consent, turn a room on or off. |
| Cameras | The cameras found at your CCTV recorder. |
| Agent status | The school computer that connects your cameras. Get the pairing code here. |
| Roster | Your class list. Parents are matched against it. |
| Approvals | Parent requests that need your decision. |
| Parents | The parents who currently have access. |
| Schedule | The hours when parents may watch. |
| Audit log | A record of who did what, and when. |
| Billing | Monthly usage. |
| Settings | School profile, class names, other administrators. |
| Support | Contact SchoolEye. |
Step 1.4 — Signing in next time
- Enter your email and password, then click Continue (as in Step 1.1).
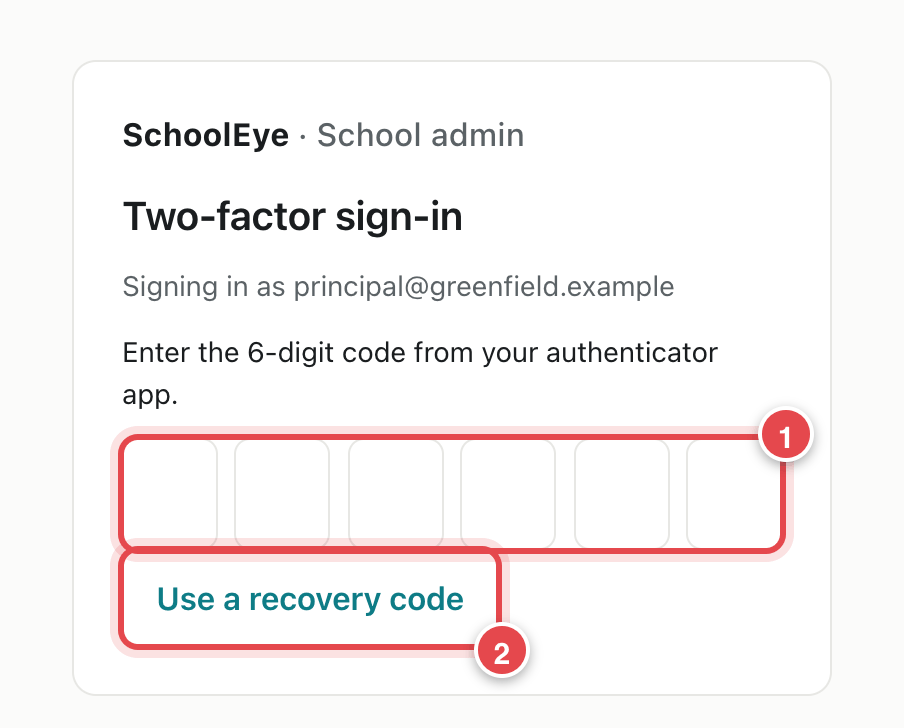
- Open your authenticator app and type the current 6-digit code into the six boxes.
Step 1.5 — If you lose your phone: use a recovery code
- On the code page, click Use a recovery code (2 in the picture above).
- Type one of the recovery codes you saved 1 and click Sign in 2.
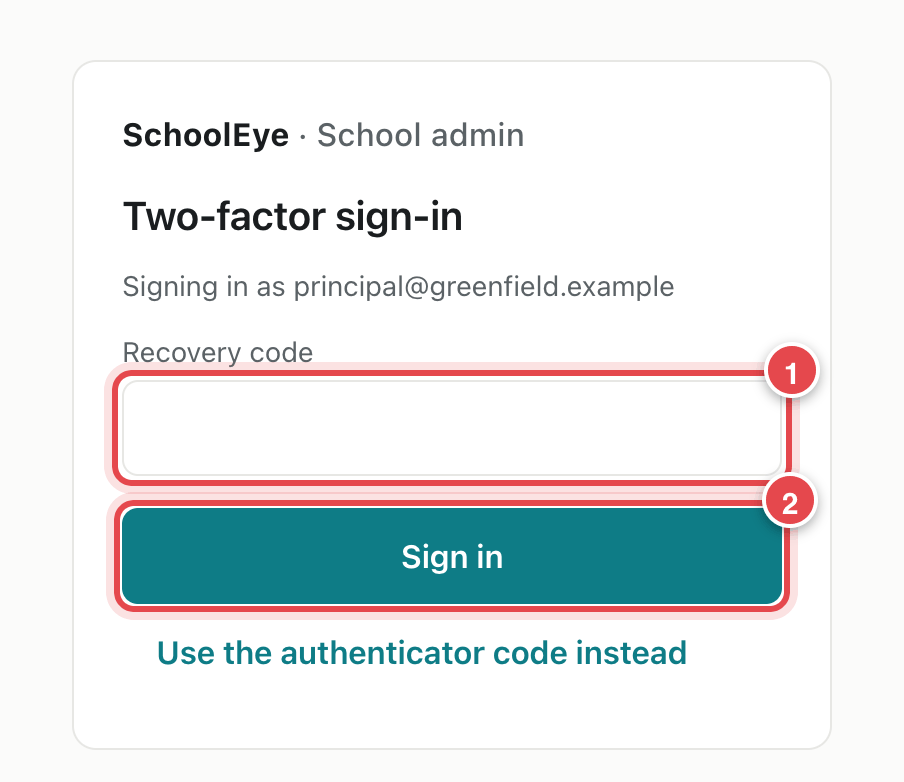
Each recovery code works only once, so cross it off your list. To go back to the normal code page, click Use the authenticator code instead.
Important: If your phone is lost for good, tell SchoolEye Support as soon as you are signed in. They will reset your two-step verification so you can add your new phone (repeat Step 1.2).
Step 1.6 — If you forget your password
On the sign-in page, click Forgot password? 1.
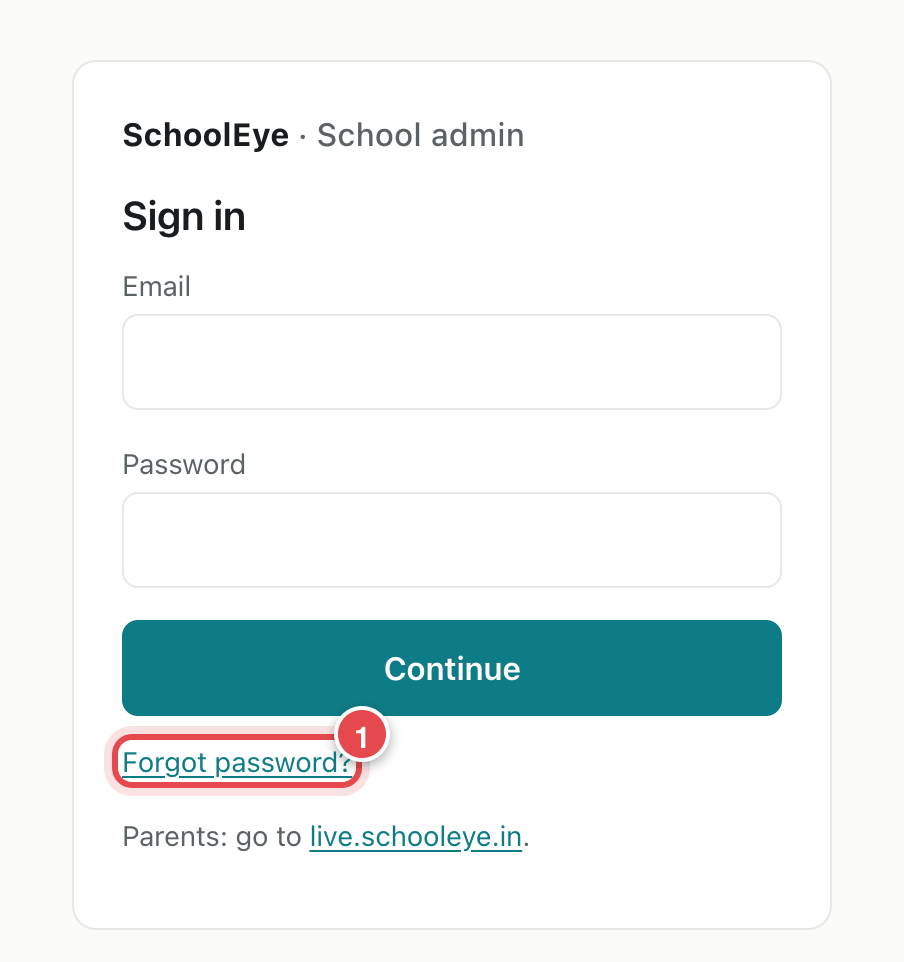
Forgot password? link on the sign-in page Type your email address 1 and click Send reset link 2.
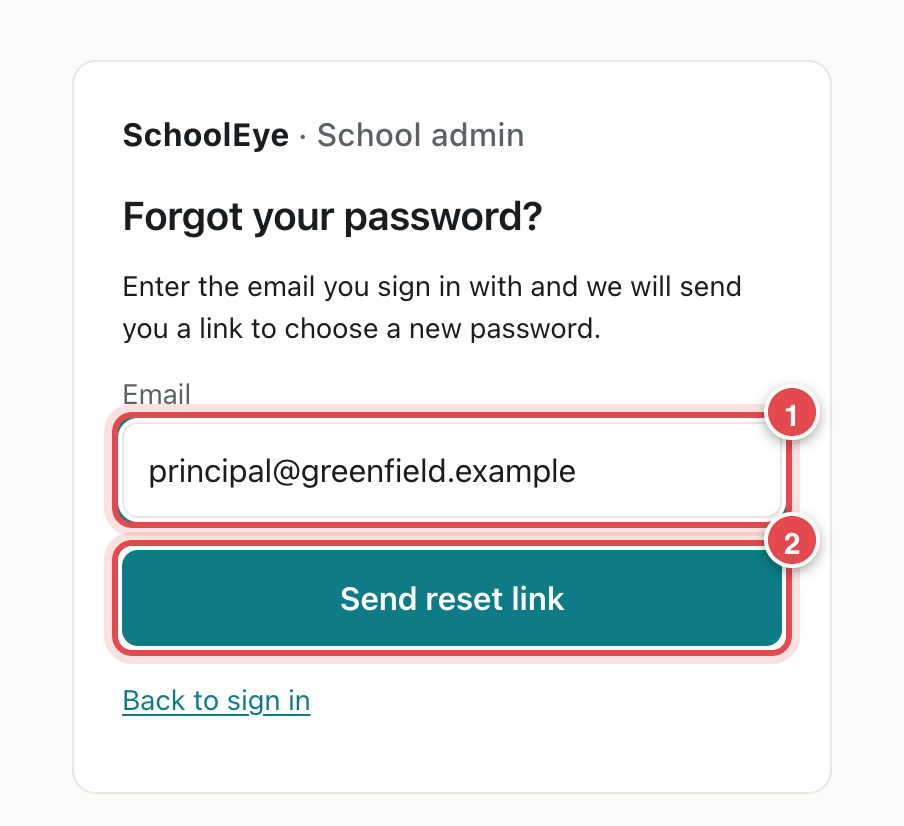
The Forgot your password page The page always shows the same message, whether or not the address is on file. This protects everyone's privacy.
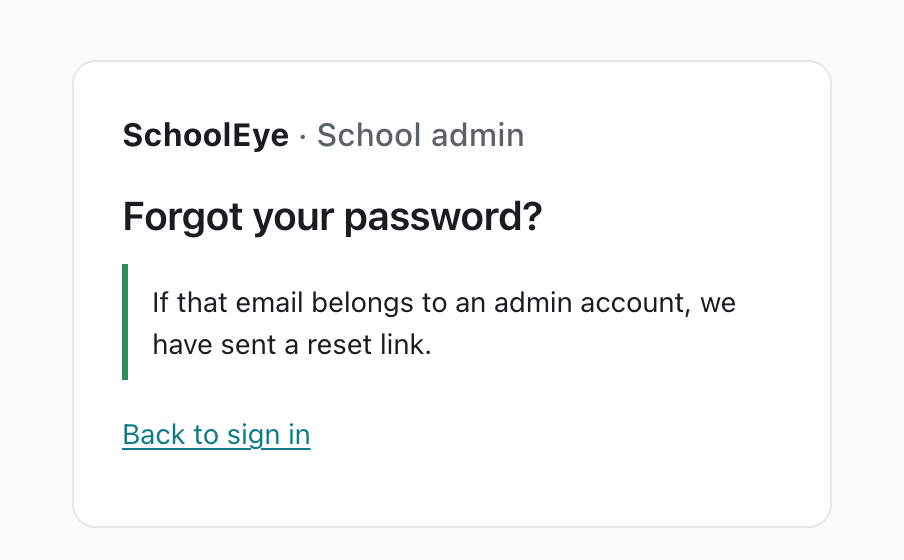
Confirmation that a reset link has been sent Open the email "SchoolEye - Reset your admin password" and click Choose a new password 1. The link works once and stops working after 45 minutes.
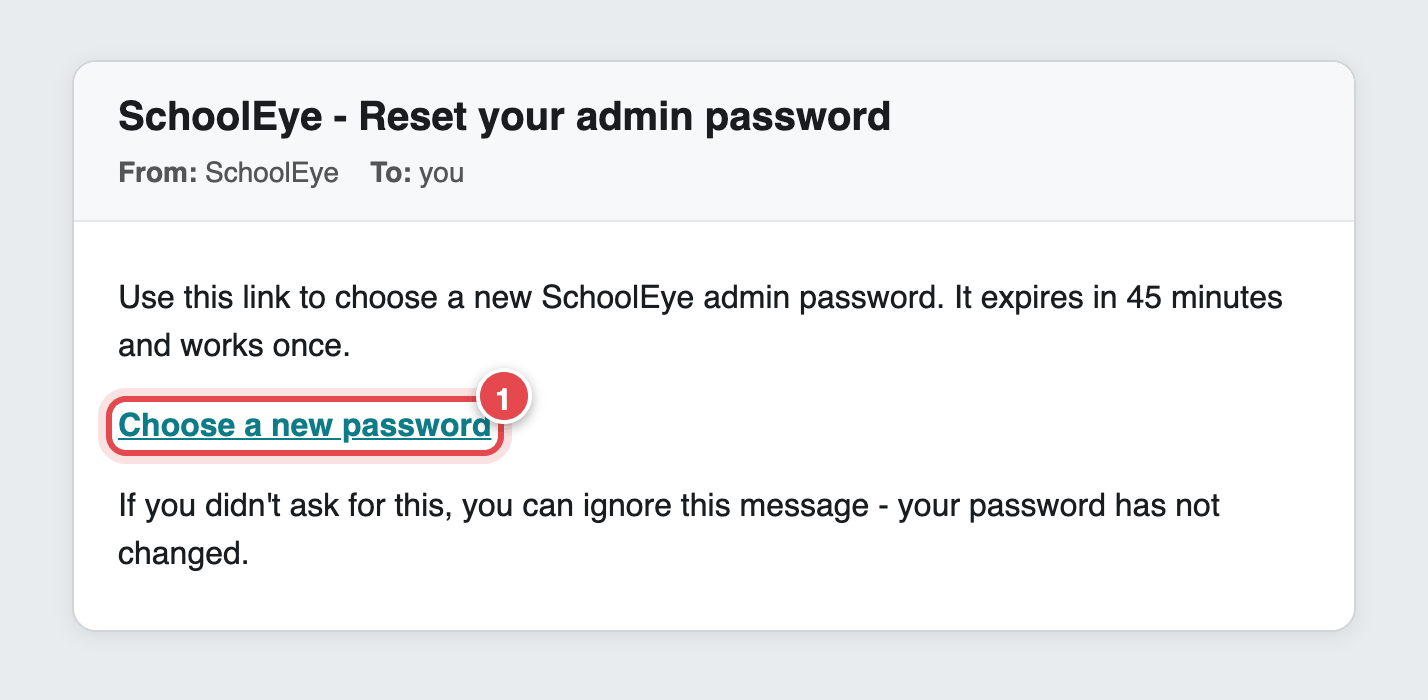
The reset email (styling may differ in your email program) Type your new password twice 1 2 and click Change password 3.
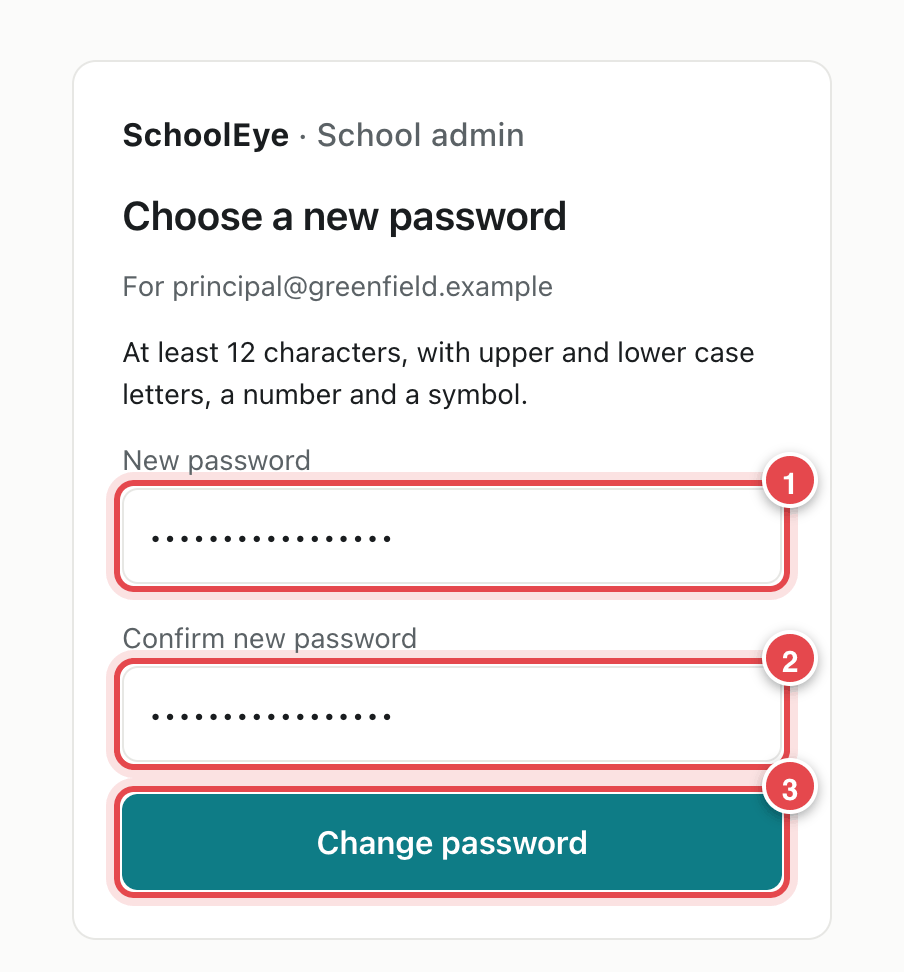
The Choose a new password page A good password has at least 12 characters, with capital and small letters, a number and a symbol, and does not contain your name or the first part of your email address.
You will see Password changed. Click Go to sign in 1 and sign in with the new password and your usual authenticator code.
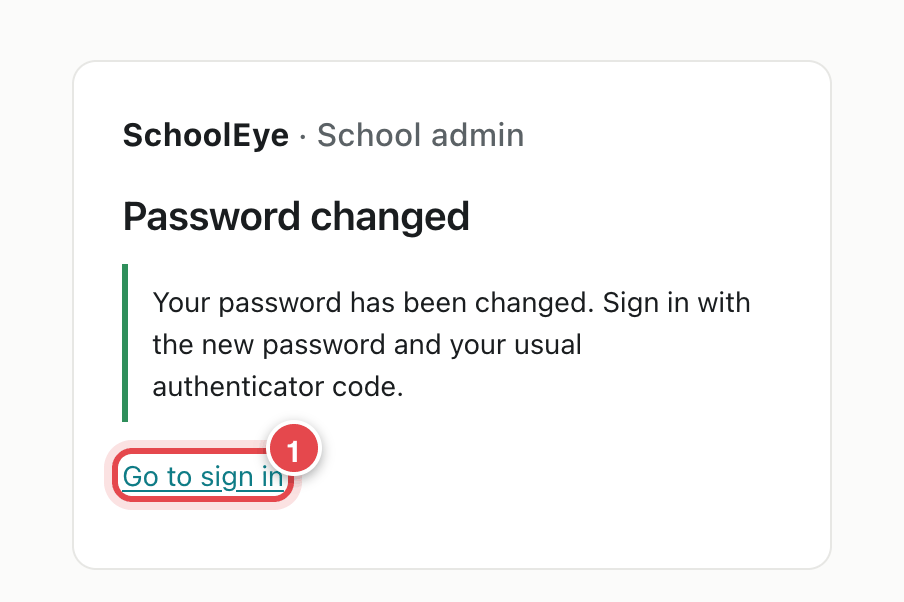
Password changed
Note: Changing your password does not change your authenticator. You still use the same phone.
Tip: No email? Wait a few minutes and check your Spam or Junk folder. Make sure you typed the address you sign in with. If it still does not arrive, ask your Super Admin or contact SchoolEye Support.
Part 2 — Set up your school
Step 2.1 — Check your school profile
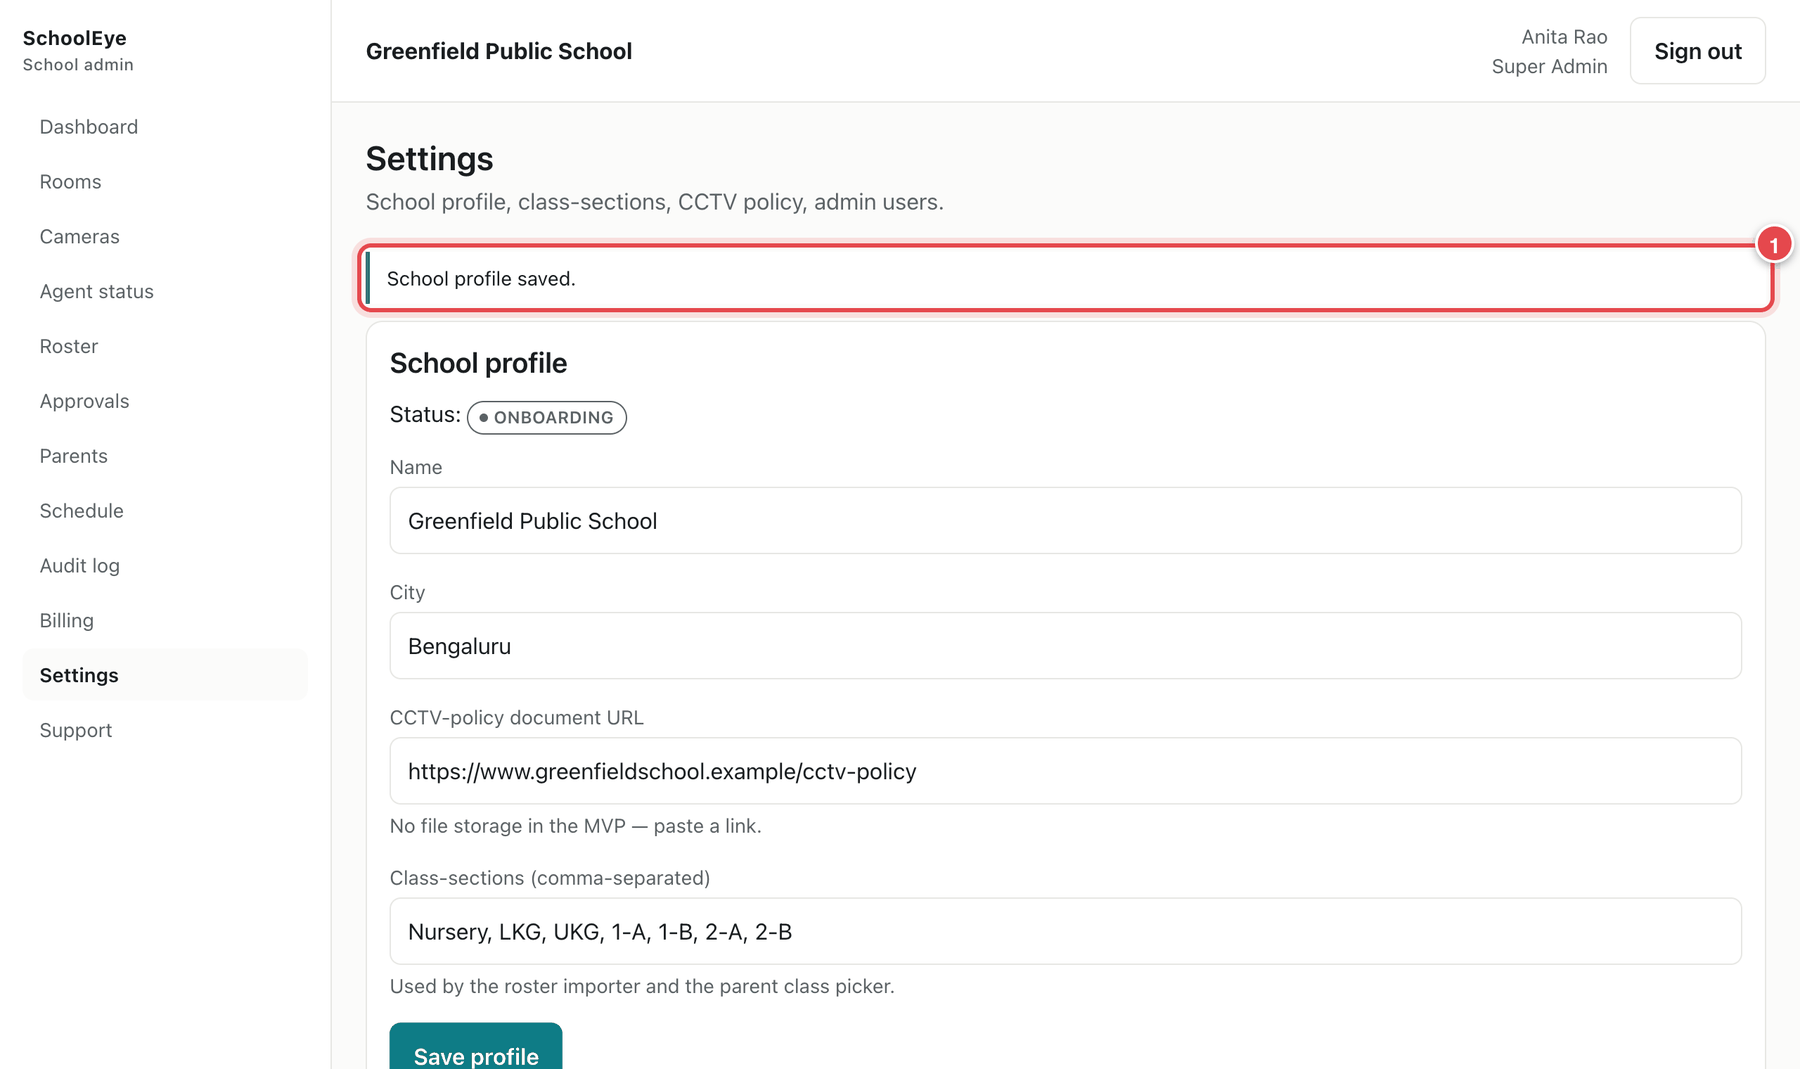
- In the menu, click Settings. The School profile card is at the top.
- Check or fill in each field, then click Save profile 5.
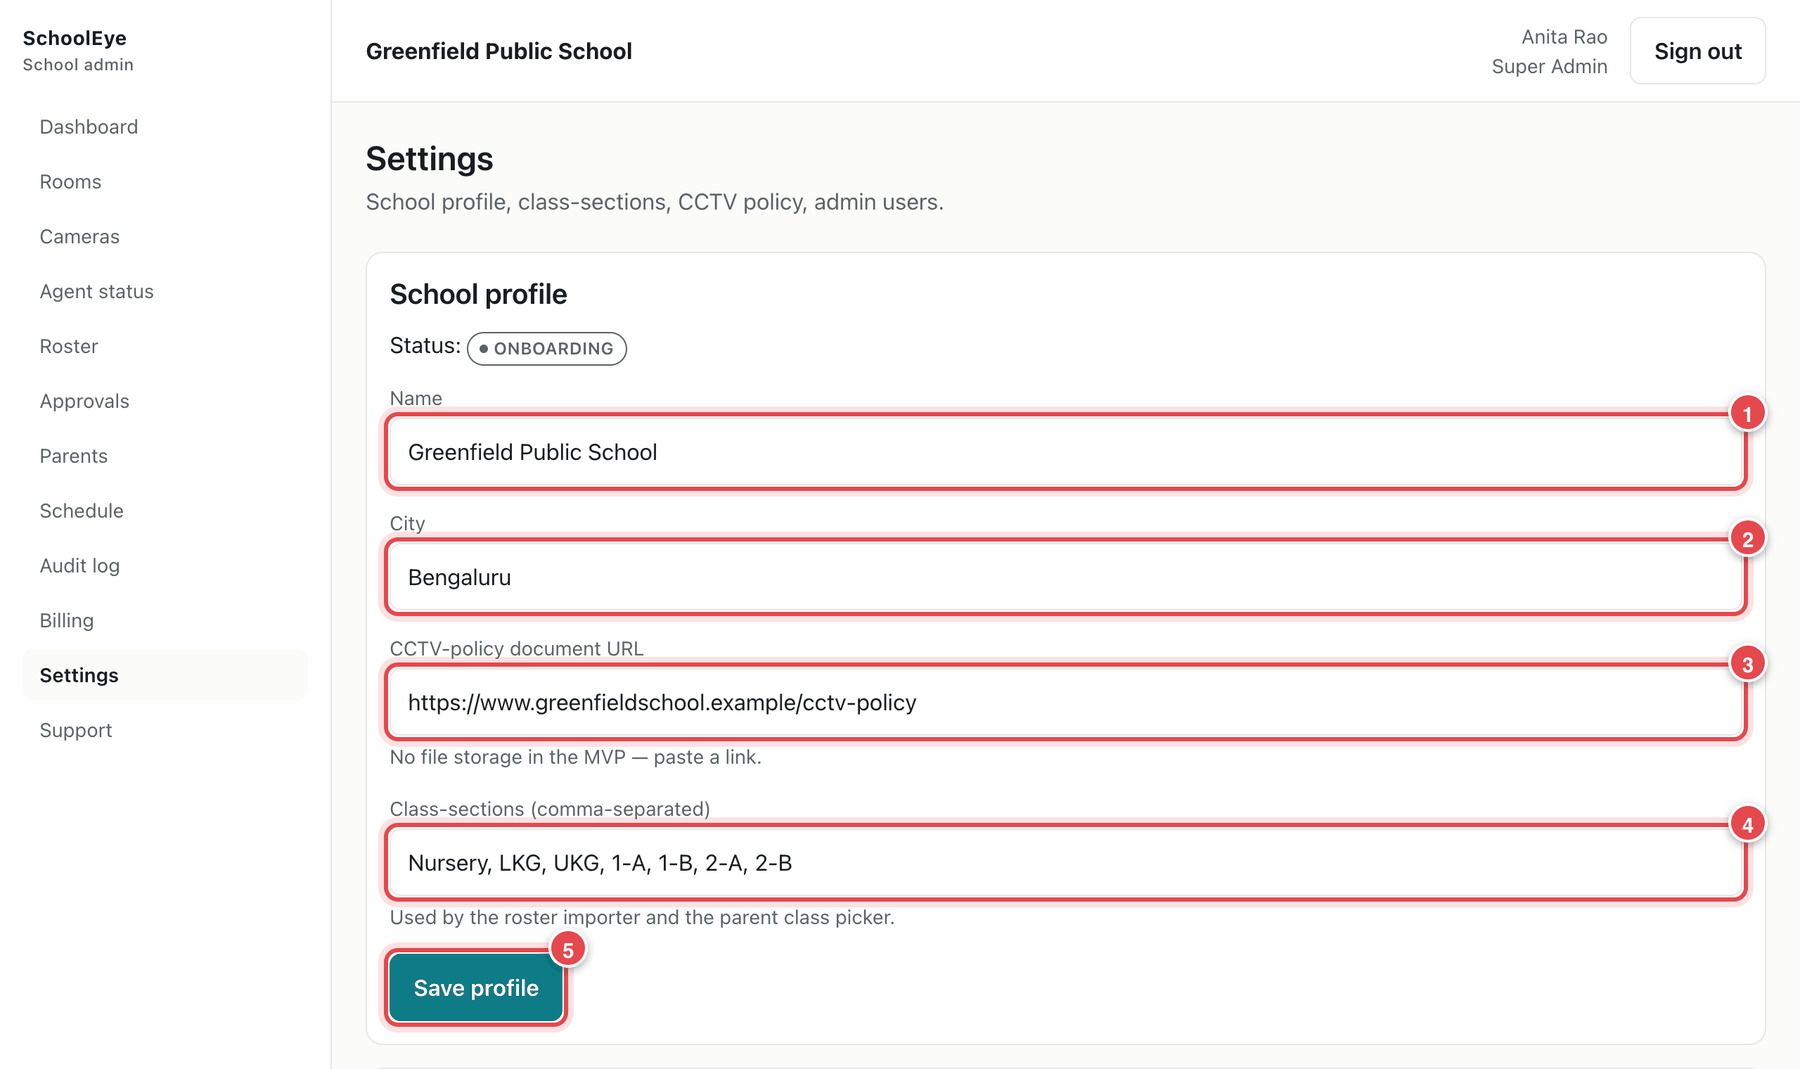
| Field | What to enter | |
|---|---|---|
| 1 | Name | Your school's full name, as parents know it. |
| 2 | City | Your city or town. It is shown next to the name when parents choose a school. |
| 3 | CCTV-policy document URL | A web link to your school's CCTV or privacy policy (for example a page on your website or a shared document). There is no file upload — paste a link. |
| 4 | Class-sections | Every class name, separated by commas, for example Nursery, LKG, UKG, 1-A, 1-B, 2-A, 2-B. |
Important: Get the class-sections right before Part 4. Every class name in your class list must match one of these exactly (capital letters, spaces and hyphens included).
- You will see School profile saved.
Note: Only a Super Admin can change the school profile. Other roles see it read-only.
Step 2.2 — Add other administrators (optional)
Give each person who helps run SchoolEye their own sign-in. Do not share one login between people.
In Settings, scroll to Admin users and click Add admin 1.
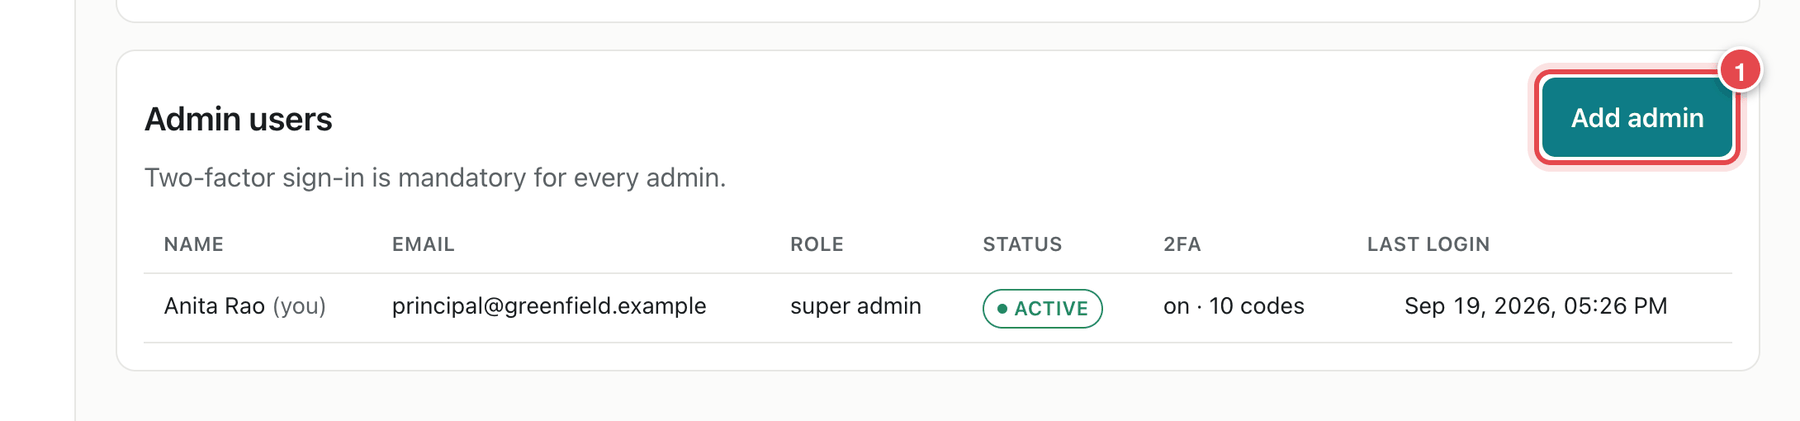
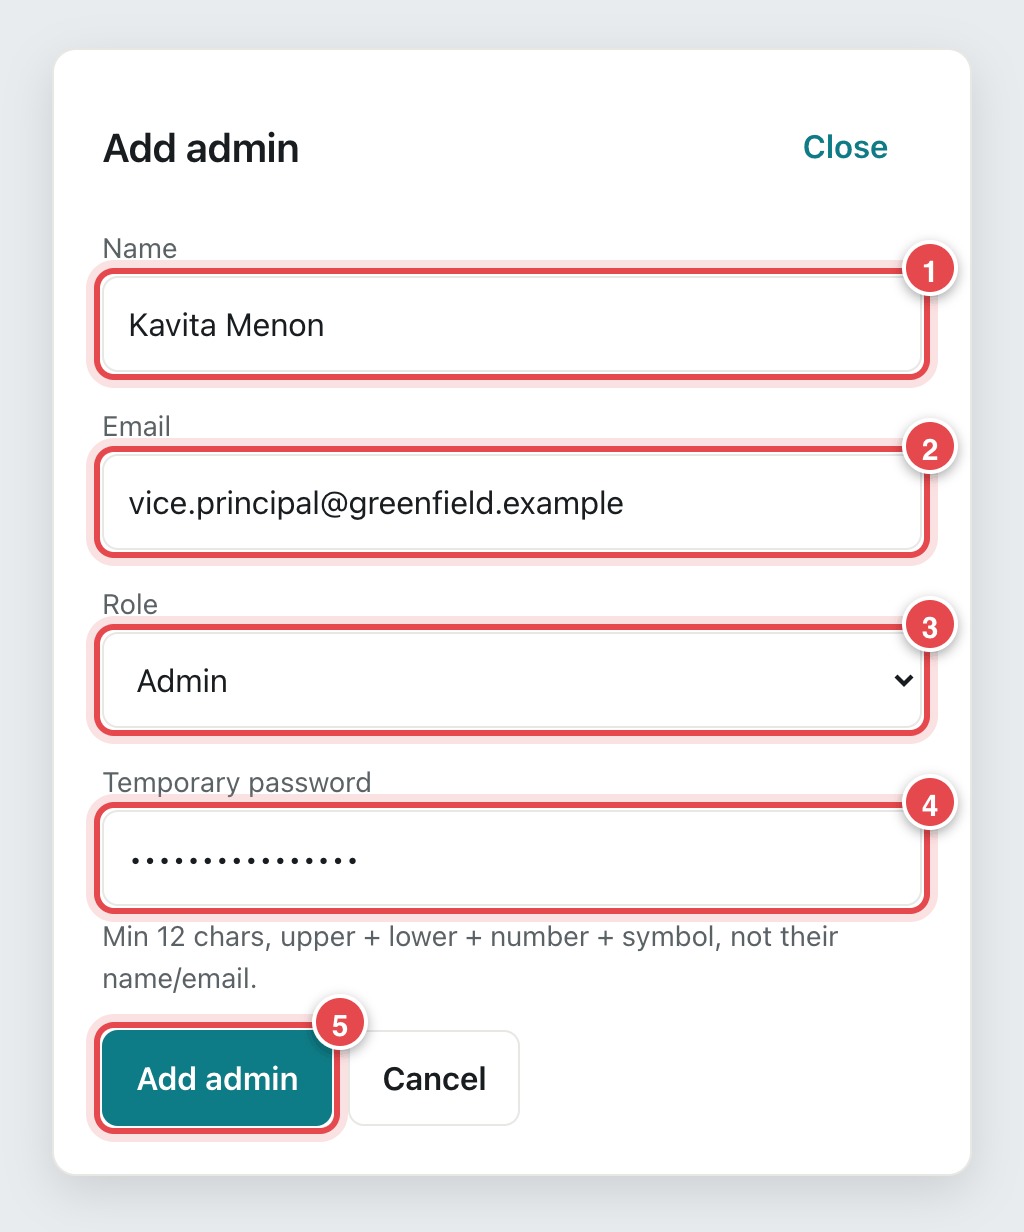
The Admin users card Fill in Name 1, Email 2 (this becomes their sign-in), Role 3 and a Temporary password 4. Then click Add admin 5.
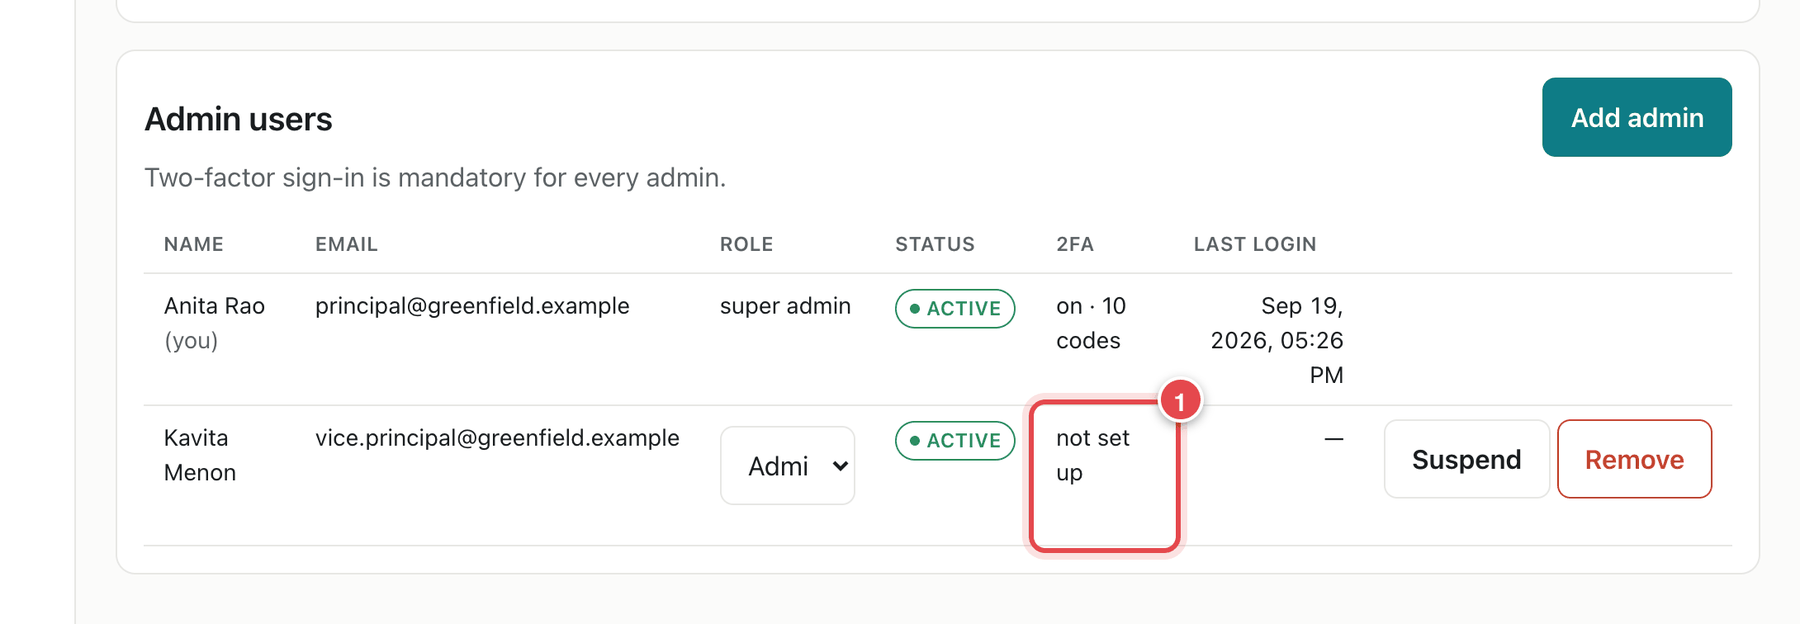
The Add admin window The new person appears in the list. The 2FA column says not set up 1 until they sign in and finish Step 1.2.
The new administrator in the list
| Role | Usually given to | Can do | Cannot do |
|---|---|---|---|
| Super Admin | Principal | Everything, including adding administrators and editing the school profile | — |
| Admin | Vice-principal | Rooms, cameras, roster, approvals, schedule, audit log, billing | Manage administrators; edit the school profile |
| Staff | Office or IT coordinator | Roster, approvals, parents, support tickets | Rooms, cameras, schedule (audit log is read-only) |
| Viewer | Class teacher | Read-only screens | Any change. Parent email and phone are hidden. |
Tip: Give the temporary password in person or by phone, not in the same message as their email address. Ask them to follow Steps 1.1 to 1.3. Use Suspend to switch someone off for a while and Remove when they leave.
Step 2.3 — Add rooms
In the menu, click Rooms, then Add room 1.
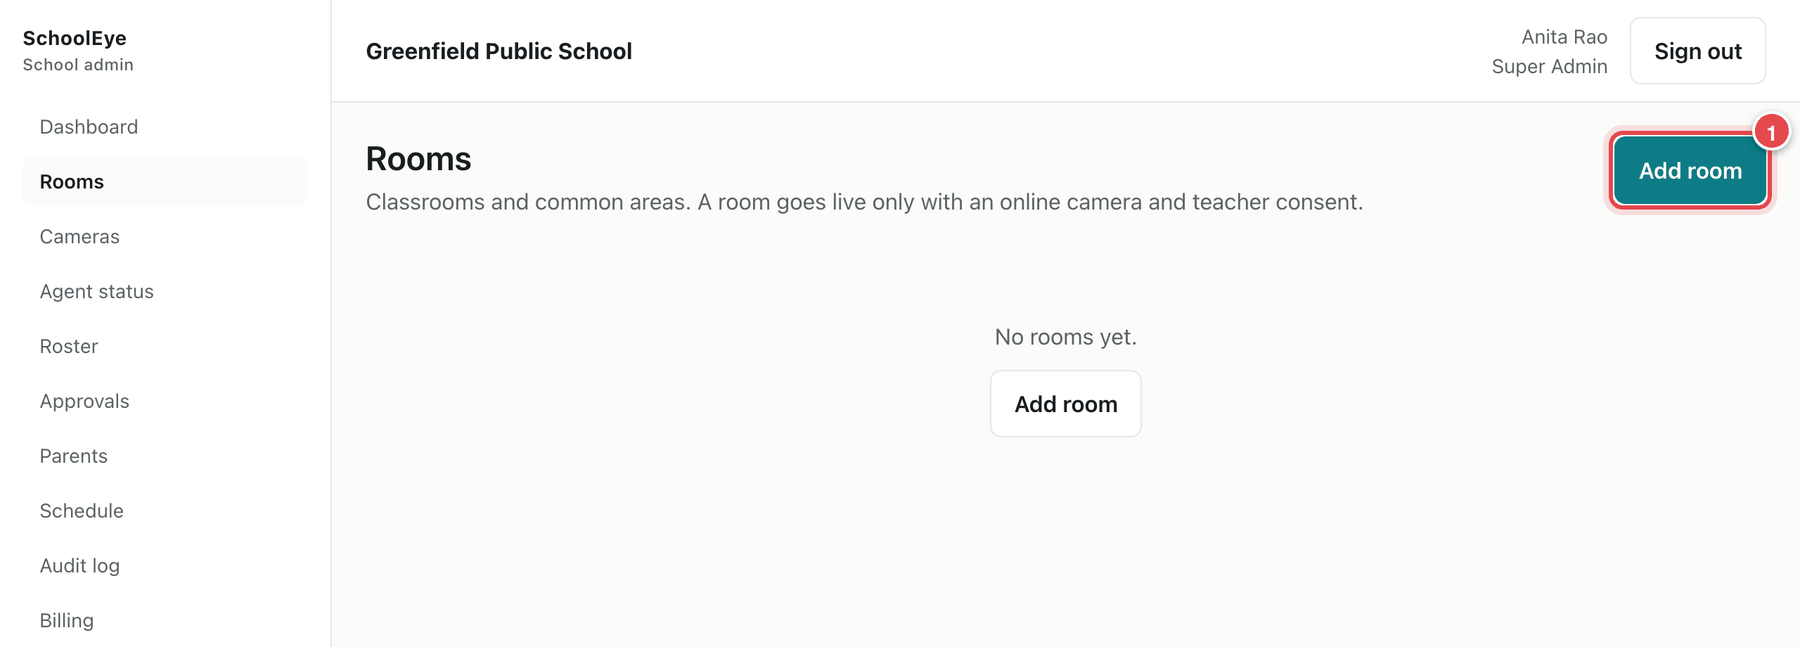
The Rooms page before any room is added Type the Room name 1 as staff and parents know it, for example Grade 1-A. Choose the Type 2: Classroom or Common area. Click Add room 3.
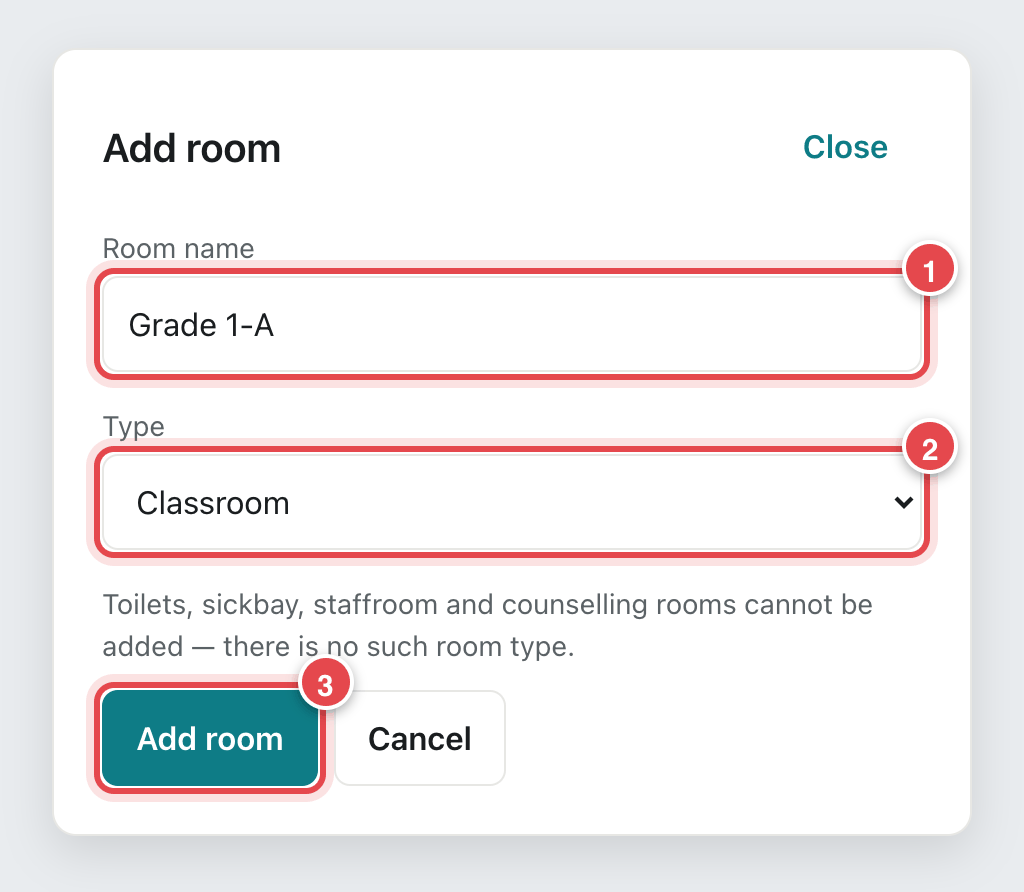
The Add room window Repeat for each room. The new rooms appear in the list. Each one shows camera none, teacher consent missing and OFF until you finish Parts 3 and 5.
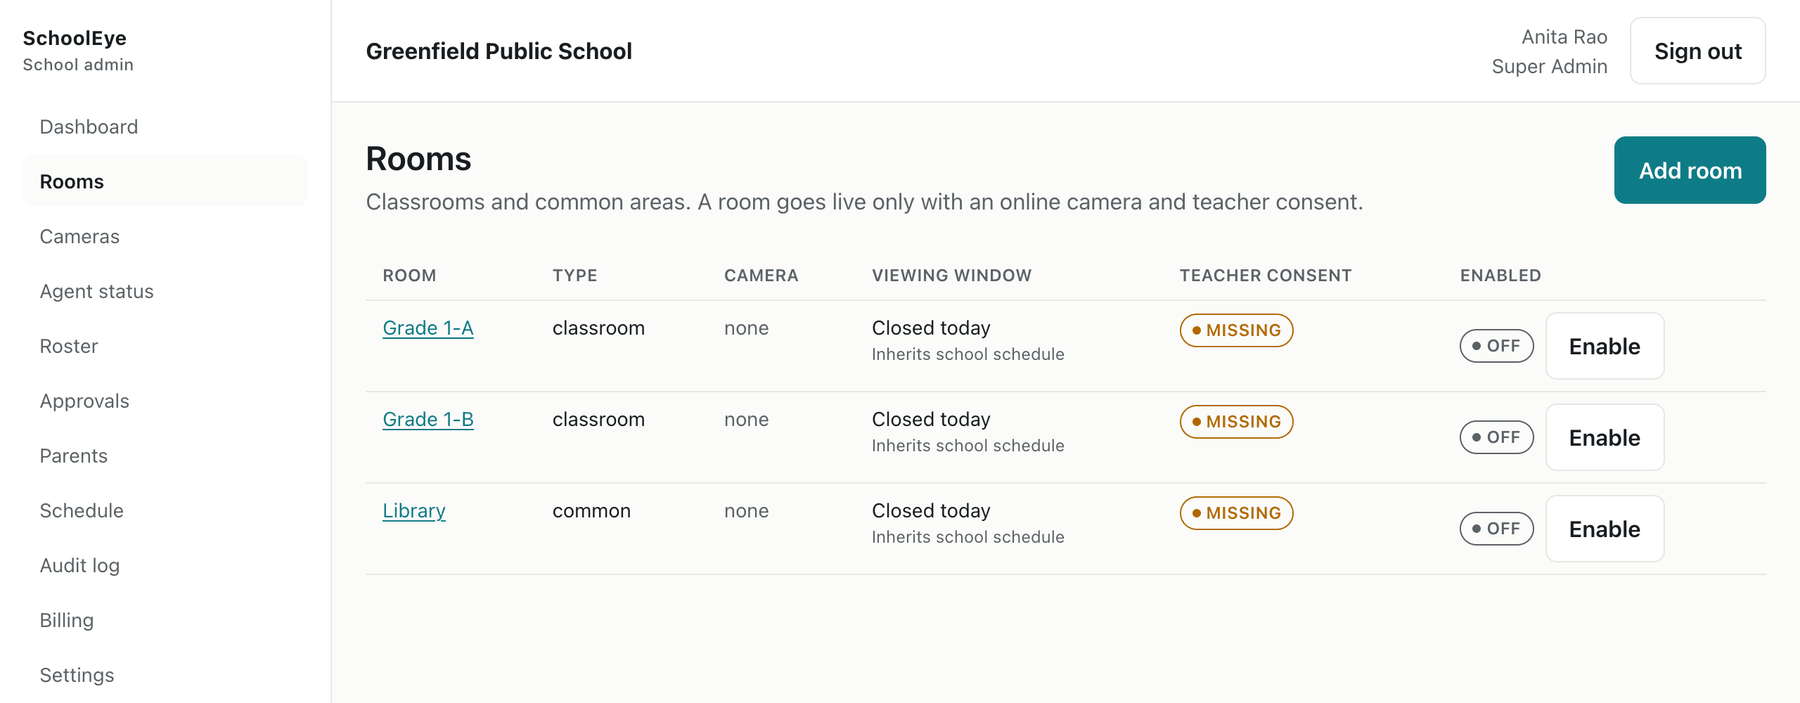
The Rooms list after adding three rooms
Note: Toilets, sick bay, staff room and counselling rooms cannot be added. SchoolEye has no such room type, by design.
Part 3 — Connect the cameras
SchoolEye reaches your CCTV through the SchoolEye Agent, a small program installed once on a school computer. It only makes outgoing connections and stores no video. In this part you get a one-time code for the agent, check that the agent is online, and link each camera to a room.
Step 3.1 — Get a pairing code
Do this when the person installing is at the school computer, ready to type the code in.
In the menu, click Agent status. If no agent is installed yet, the page looks like this. Click Get installer / pair agent 1.
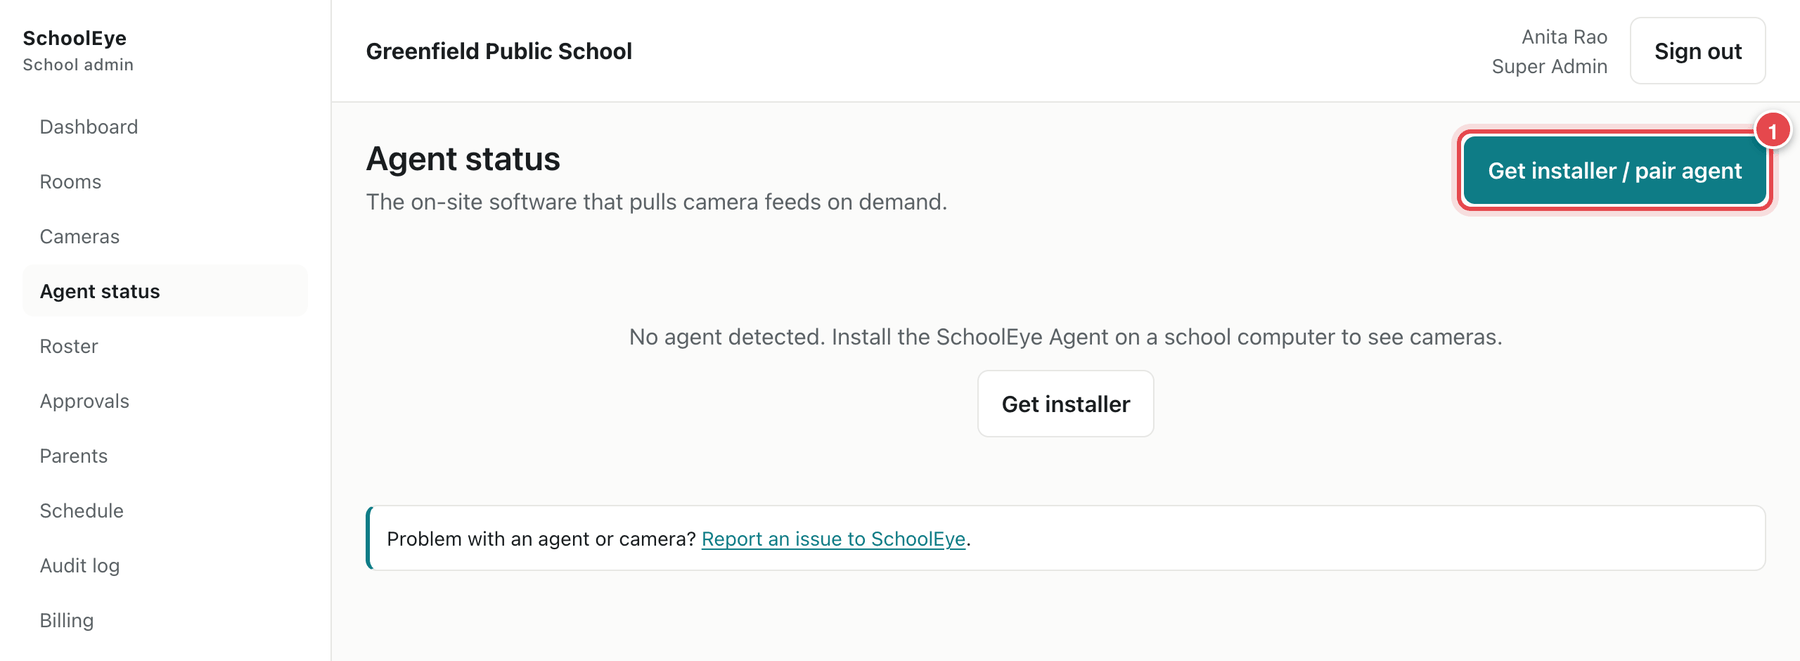
Agent status before an agent is installed A window shows your one-time pairing code 1. Give it to the person installing (read it out or write it down). Click Done 2 when you have passed it on.
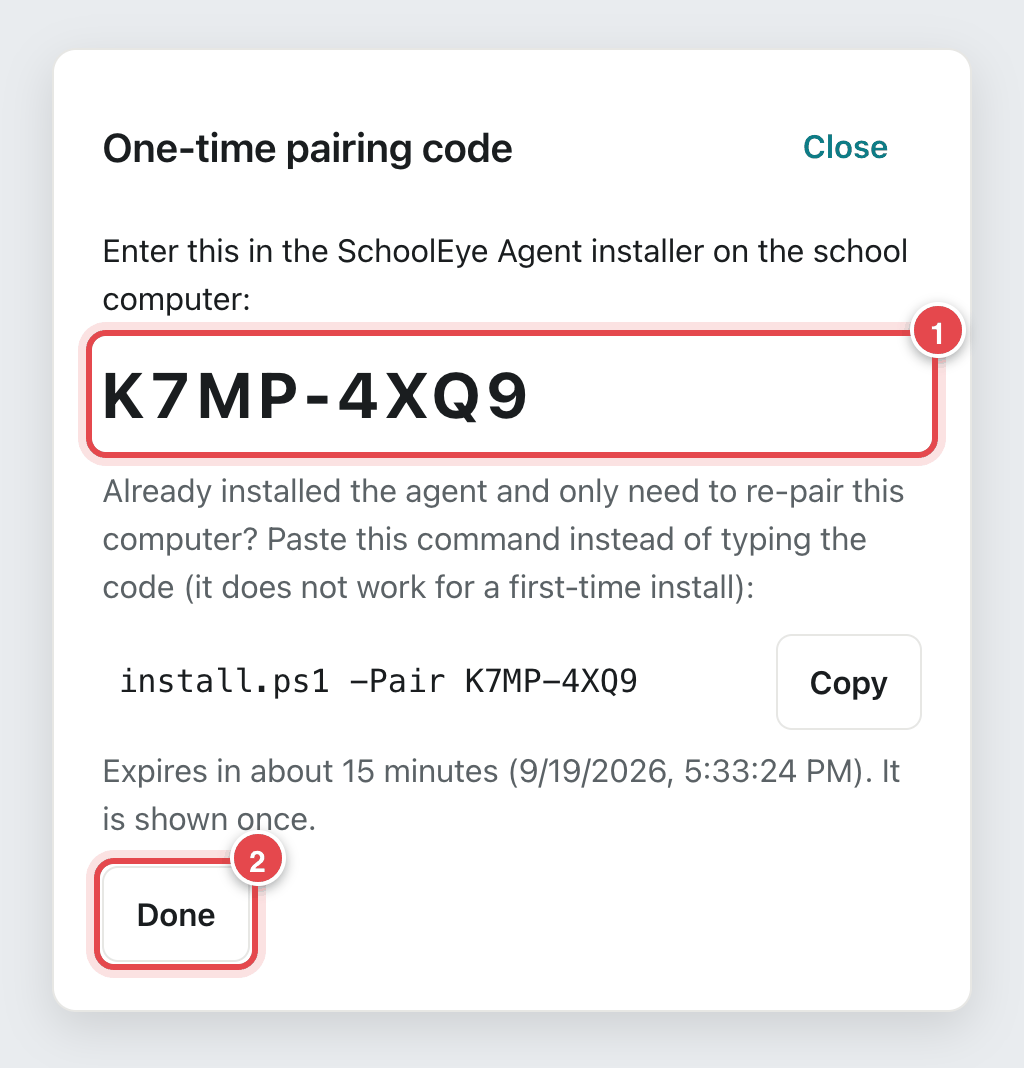
The one-time pairing code (a sample code is shown)
Important: The code works once, is shown once and expires after about 15 minutes. If it expires or you close the window, repeat step 1 to get a new code. Treat it like a password — do not post it in a group chat.
- Now install the agent on the school computer by following the SchoolEye Agent for Windows — Installation Guide. Come back to this guide when the installer says it is done.
Step 3.2 — Check that the agent is online
A minute or two after the installer finishes, open Agent status again (refresh the page if needed). The school computer is listed with the status ONLINE 1 and the number of cameras it found 2.
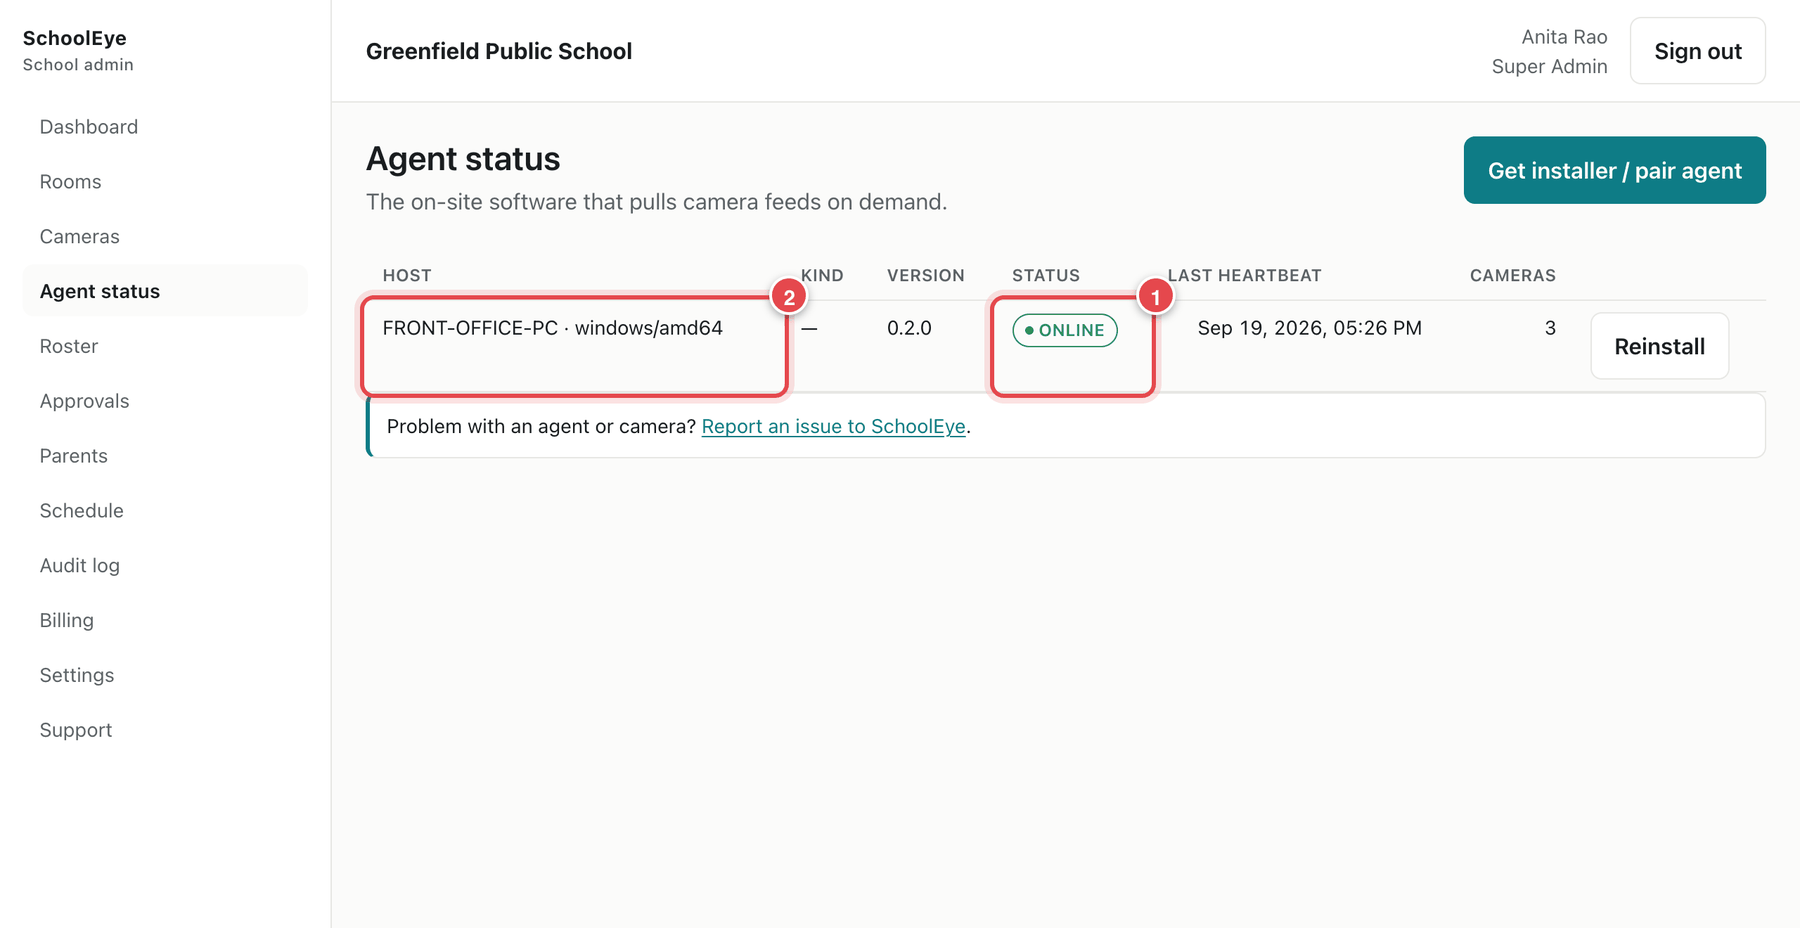
Tip: If the agent does not appear, or shows offline, make sure the school computer is switched on and connected to the internet. See "Troubleshooting" in Part 6 and in the Agent installation guide.
Step 3.3 — See the cameras that were found
In the menu, click Cameras. Each camera (channel) at your CCTV recorder appears as a row, named Channel 1, Channel 2 and so on 1. Its Room says unmapped until you link it in Step 3.4. Click Refresh 2 to update the list.
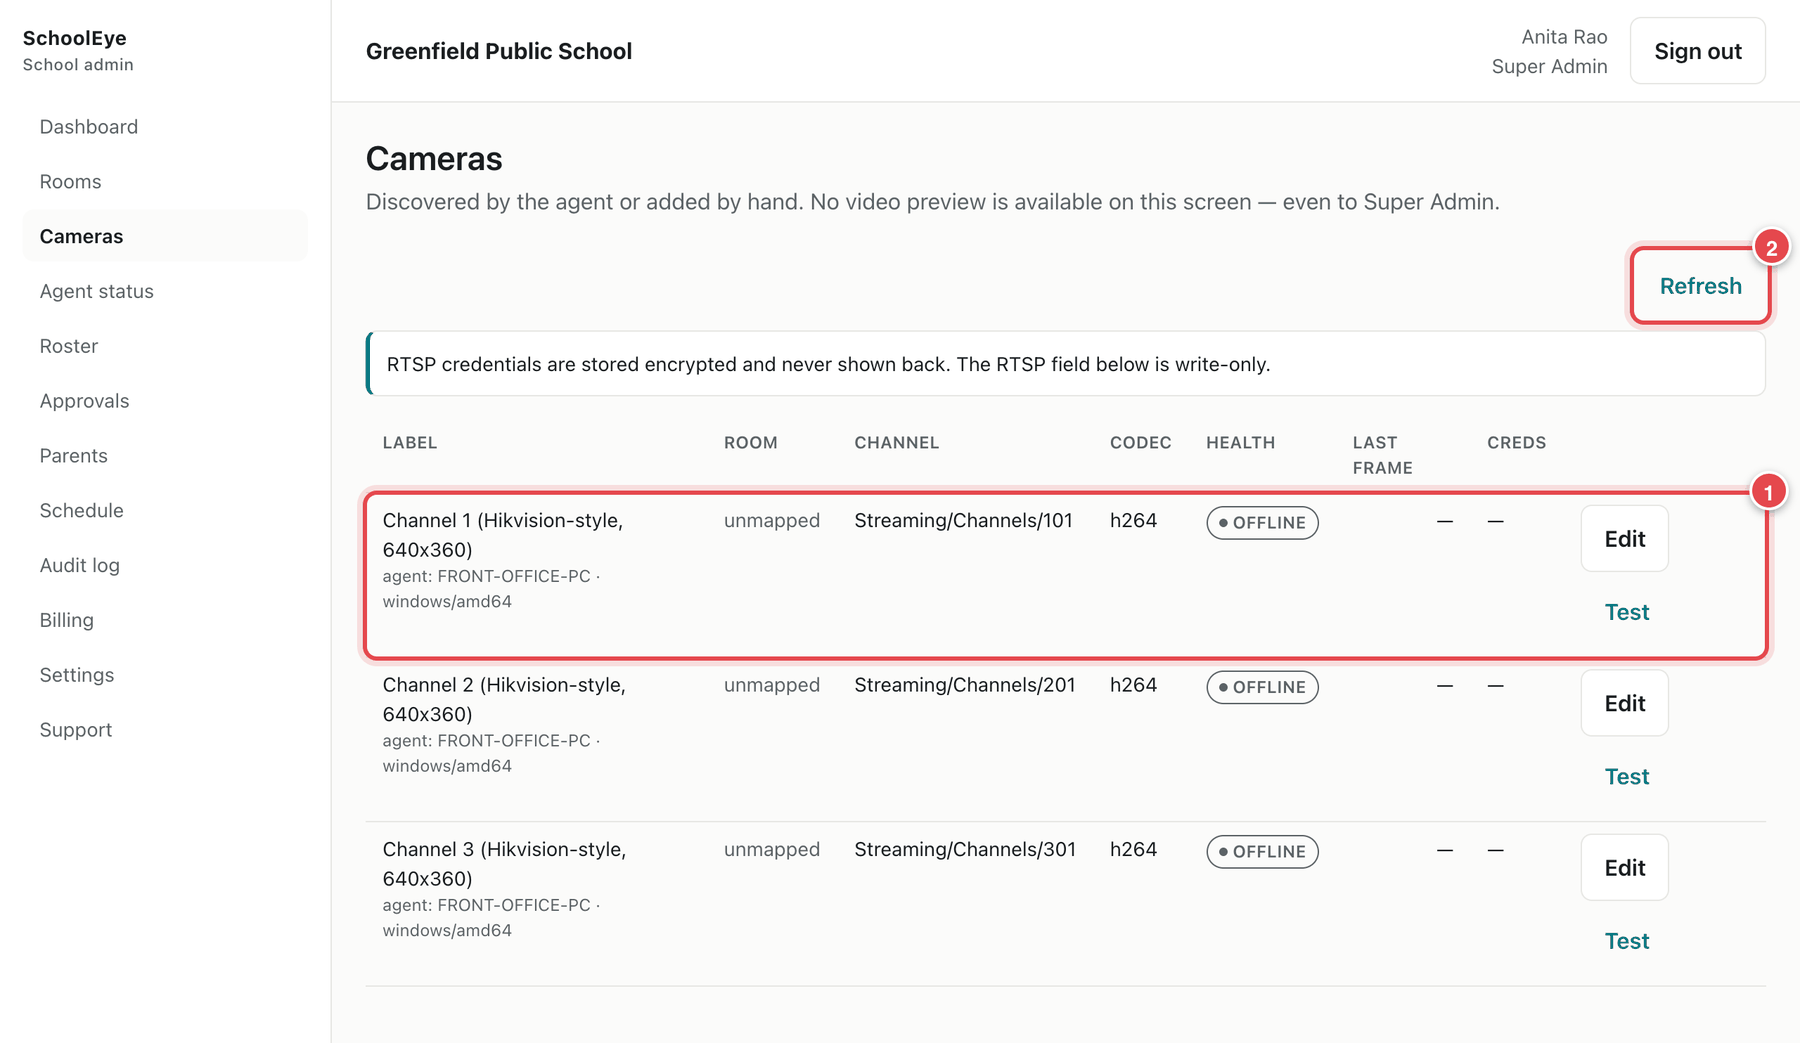
Note: Finding cameras can take a few minutes after installation. SchoolEye never shows live video on this screen — not even to administrators.
Tip: Not sure which channel is which classroom? Ask the CCTV installer, or look at the recorder's own screen.
Step 3.4 — Link a camera to a room
- In the menu, click Rooms, then click the room's name (for example Grade 1-A).
- In the Camera box, choose the camera from Map camera 1, then click Save camera 2.
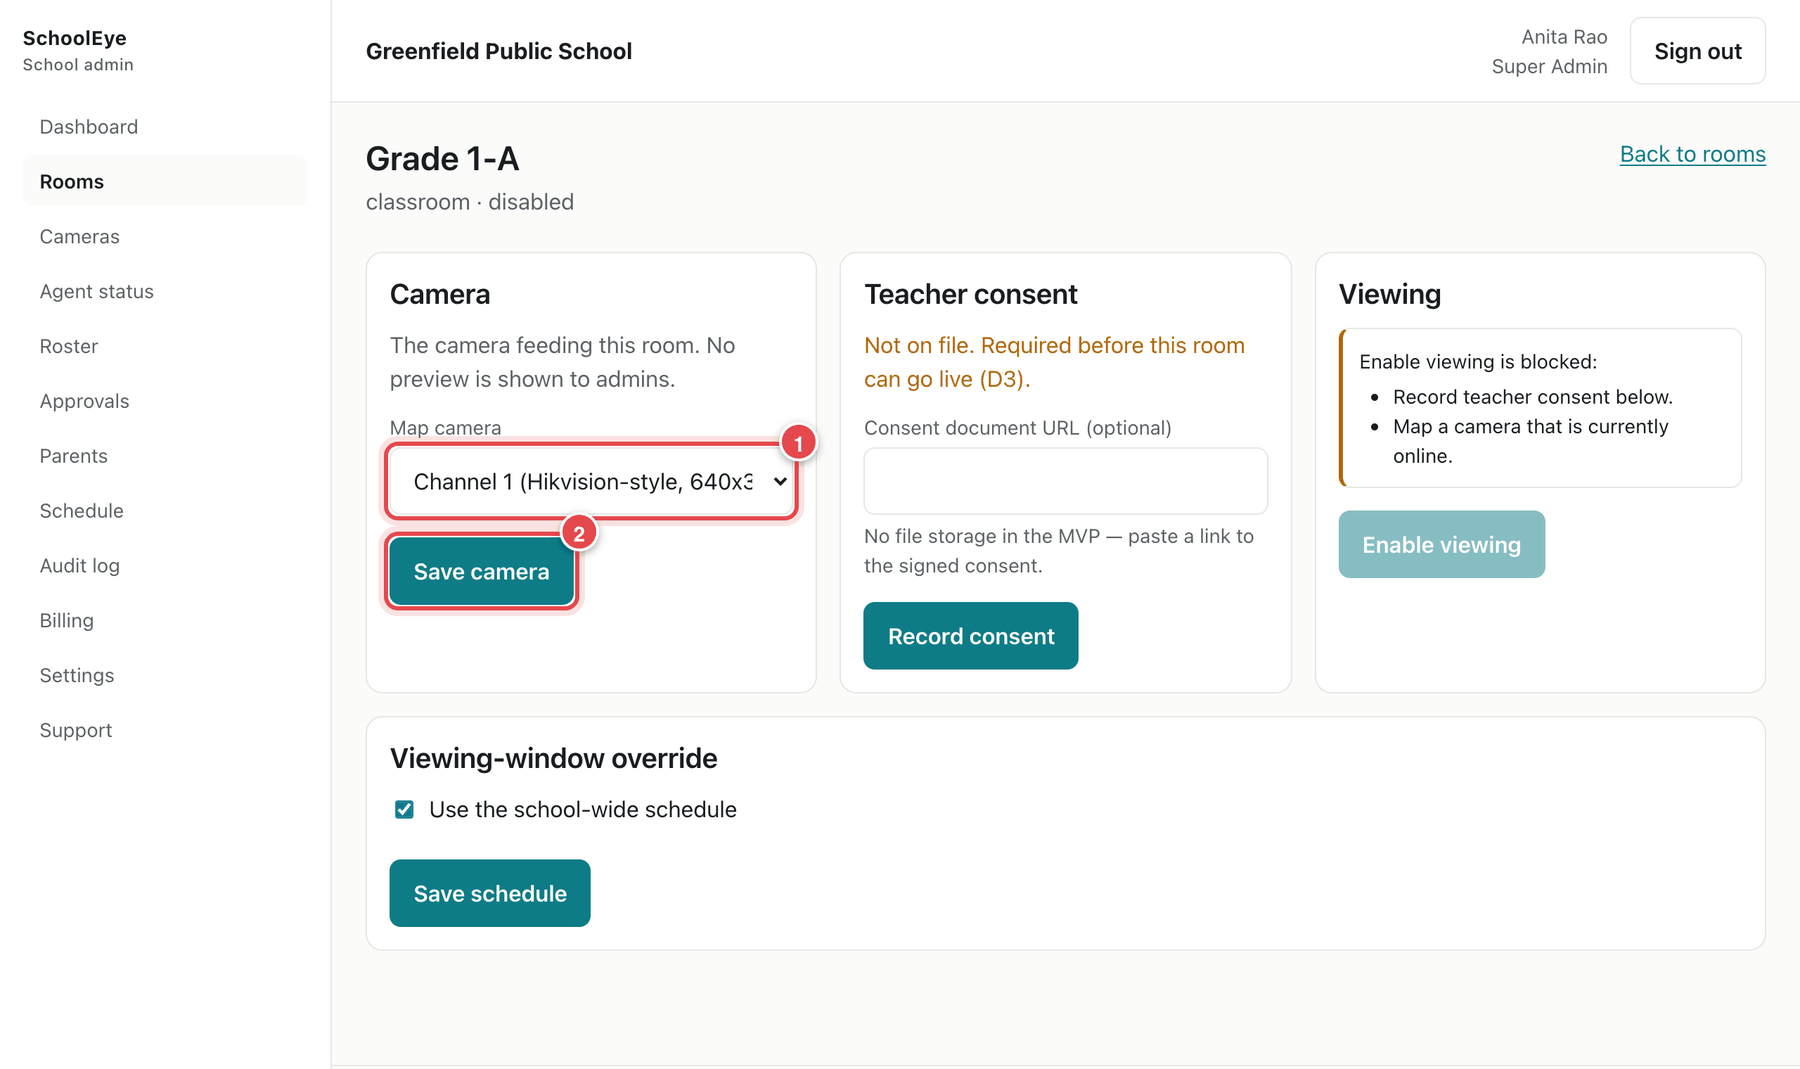
You will see Camera mapping saved. and the camera's current status. A room can only be turned on when its camera shows ONLINE.
Step 3.5 — Record teacher consent
Still on the room's page, look at the Teacher consent box. If you have a signed consent form online, paste its link at 1 (optional). Then click Record consent 2.
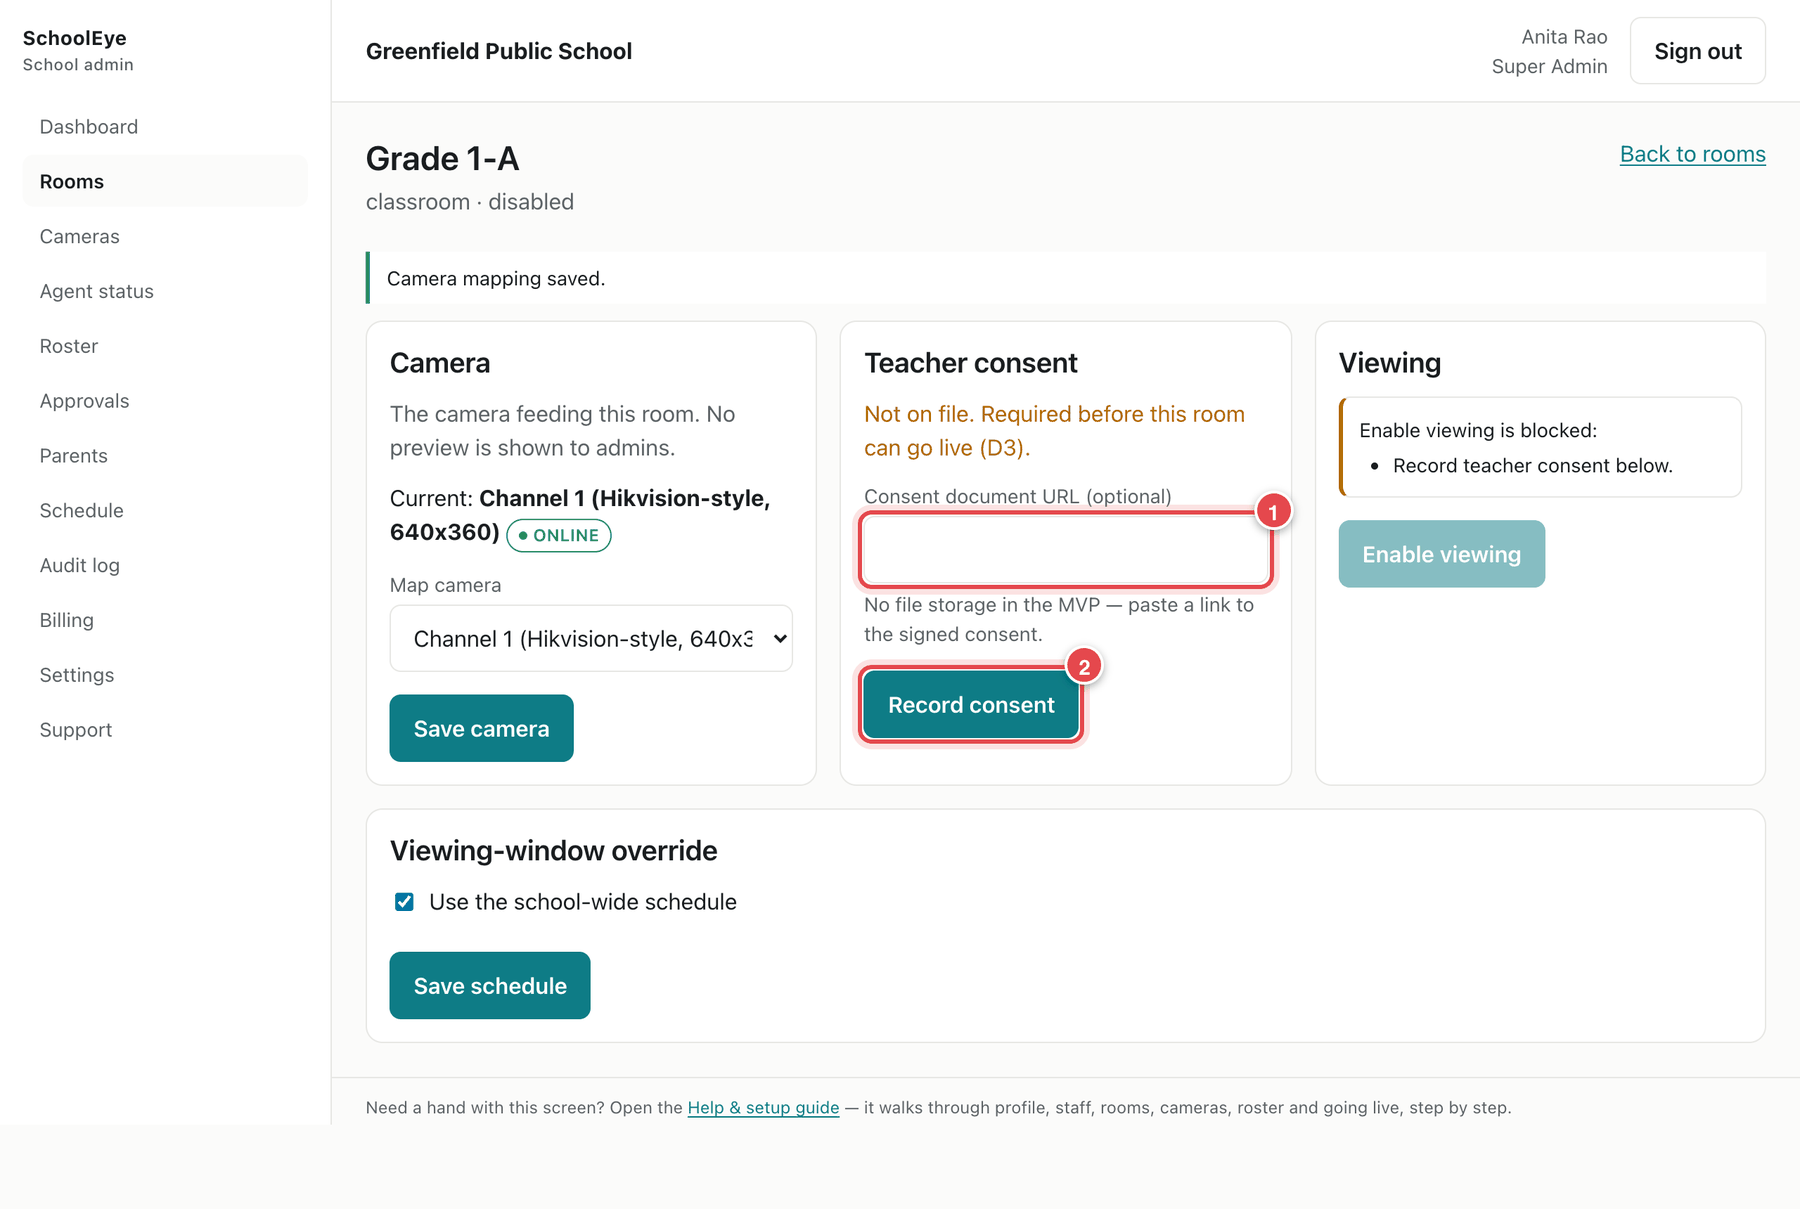
You will see Teacher consent recorded. and the box changes to ON FILE with today's date.
Important: Only record consent after the class teacher has actually agreed. SchoolEye will not turn a room on without it.
Part 4 — Add the parents
Parents are let in by matching them against your class list (the roster). This part imports that list.
Step 4.1 — Prepare the class list
In the menu, click Roster. Click Download template 1. A small spreadsheet (CSV file) is saved to your computer.
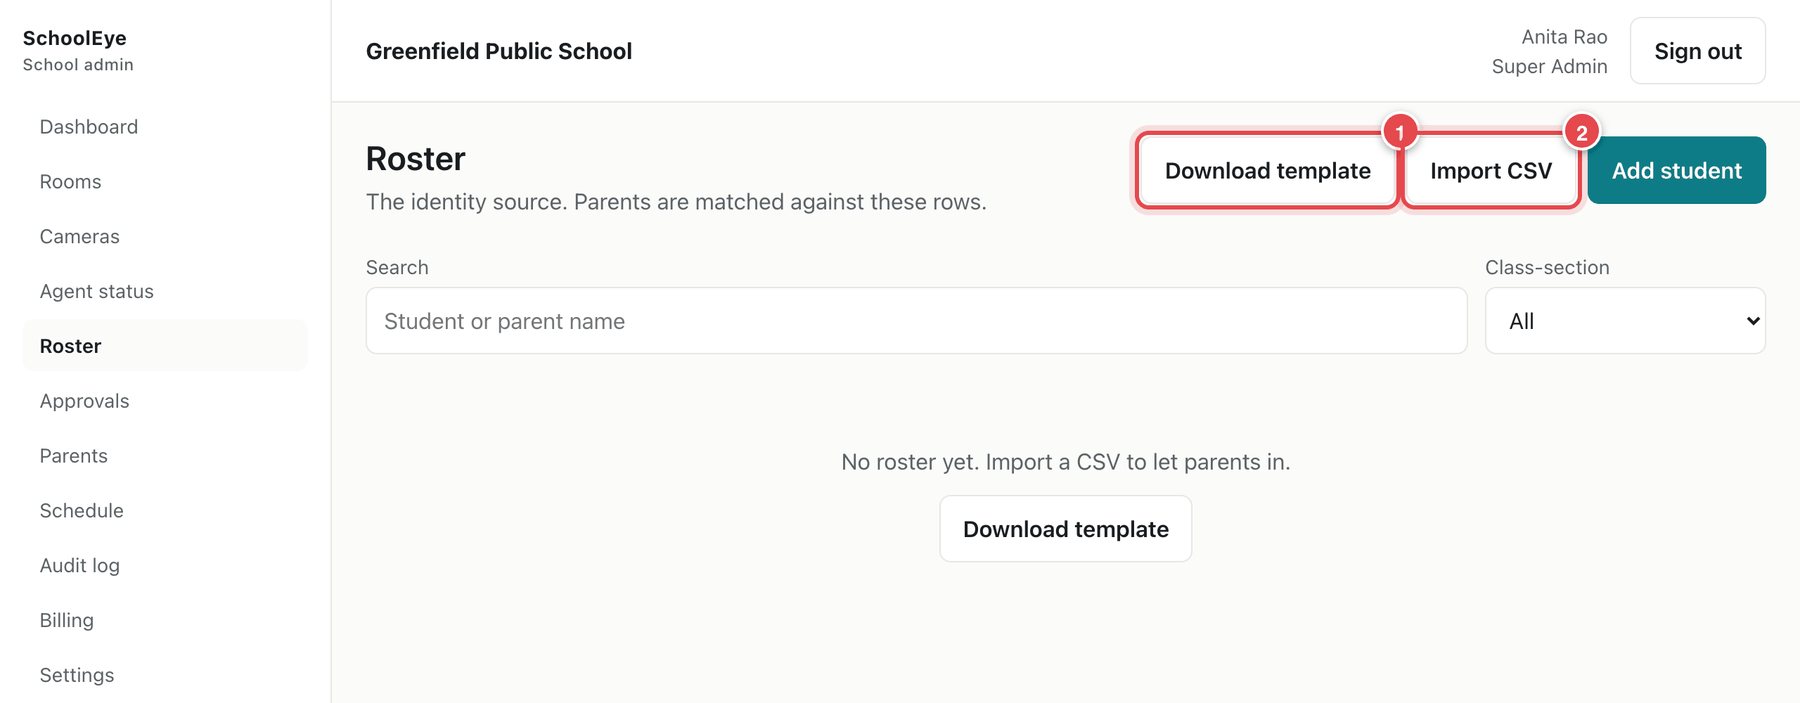
The Roster page before any import Open it in Excel, Google Sheets or similar and fill in one row per student. Keep the top row exactly as it is.
| Column | What to enter |
|---|---|
class_section |
Must match one of your class-sections from Step 2.1 exactly. |
student_full_name |
The child's full name, as parents will write it. |
parent1_name, parent1_email, parent1_phone |
The first parent. Give an email or a phone number (with country code, for example +919000000000). |
parent2_name, parent2_email, parent2_phone |
The second parent (optional). |
In the spreadsheet, two example rows (fictional) look like this:
| class_section | student_full_name | parent1_name | parent1_email | parent1_phone | parent2_name | parent2_email | parent2_phone |
|---|---|---|---|---|---|---|---|
| 1-A | Aarav Sharma | Neha Sharma | neha@example.org | +919000000001 | Rohit Sharma | rohit@example.org | +919000000002 |
| 1-A | Diya Nair | Meera Nair | meera@example.org | +919000000003 |
- Save the file as CSV (UTF-8).
Step 4.2 — Import and check the list
On the Roster page, click Import CSV 2 and choose your file.
A preview appears. It shows how many students will be added or updated, how many rows have errors, and any problem on each line.
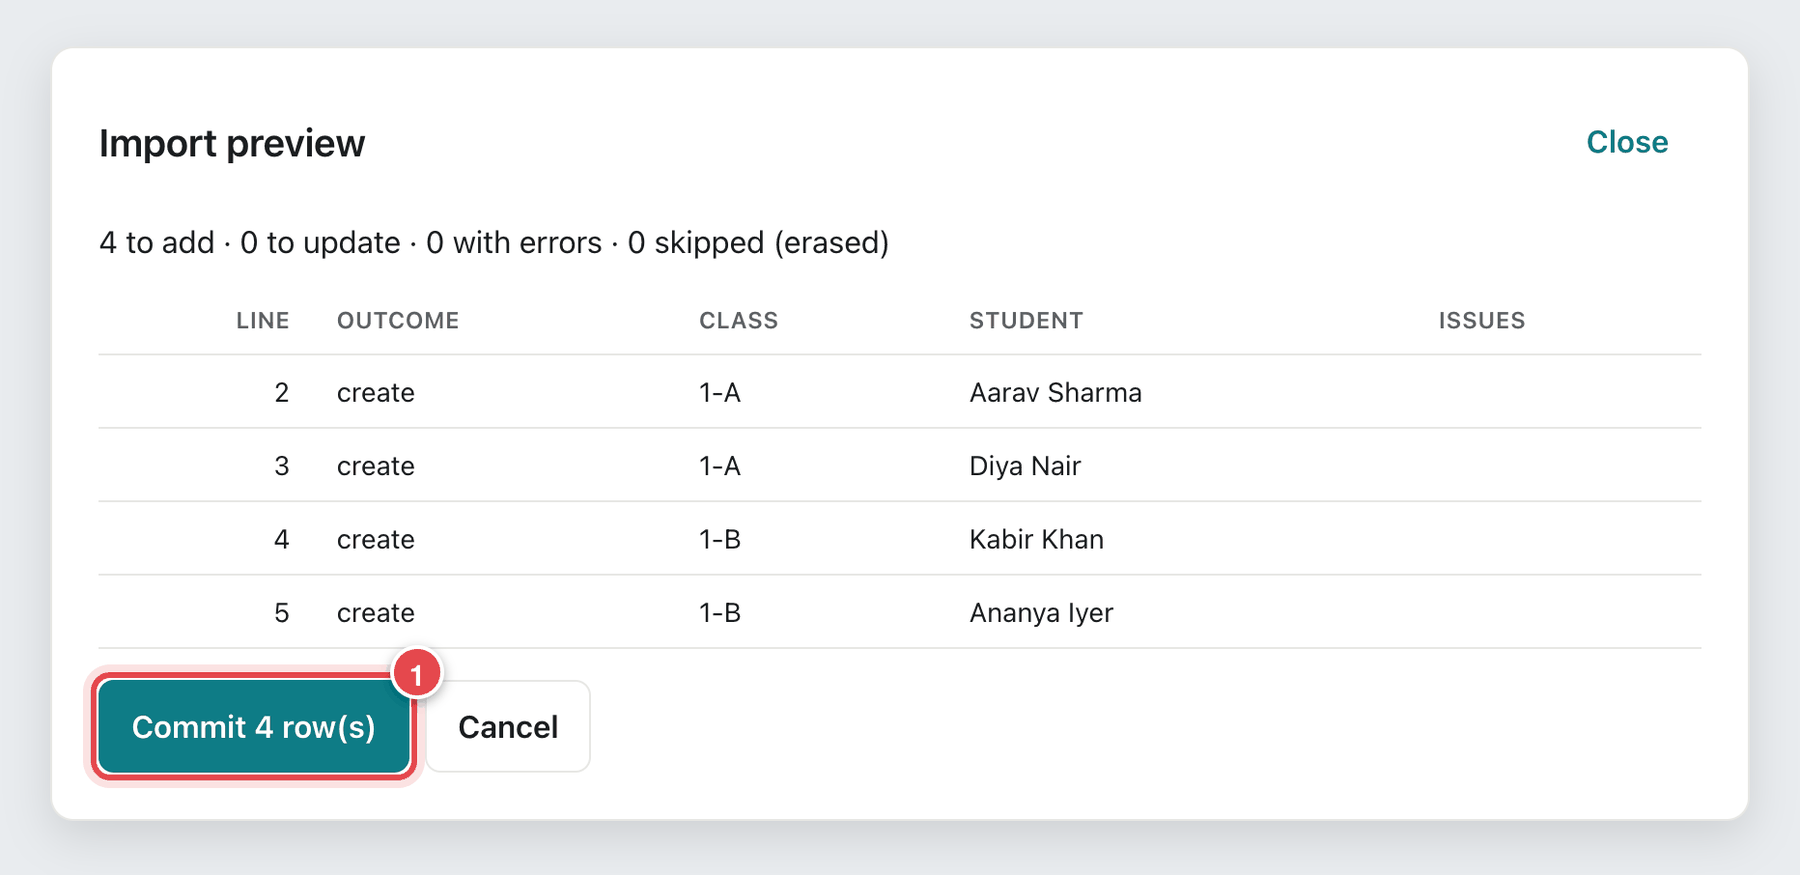
The import preview If there are errors, fix them in the spreadsheet and import again. When the preview shows 0 with errors, click Commit 1. You will see Imported: 4 added, 0 updated, 0 skipped.
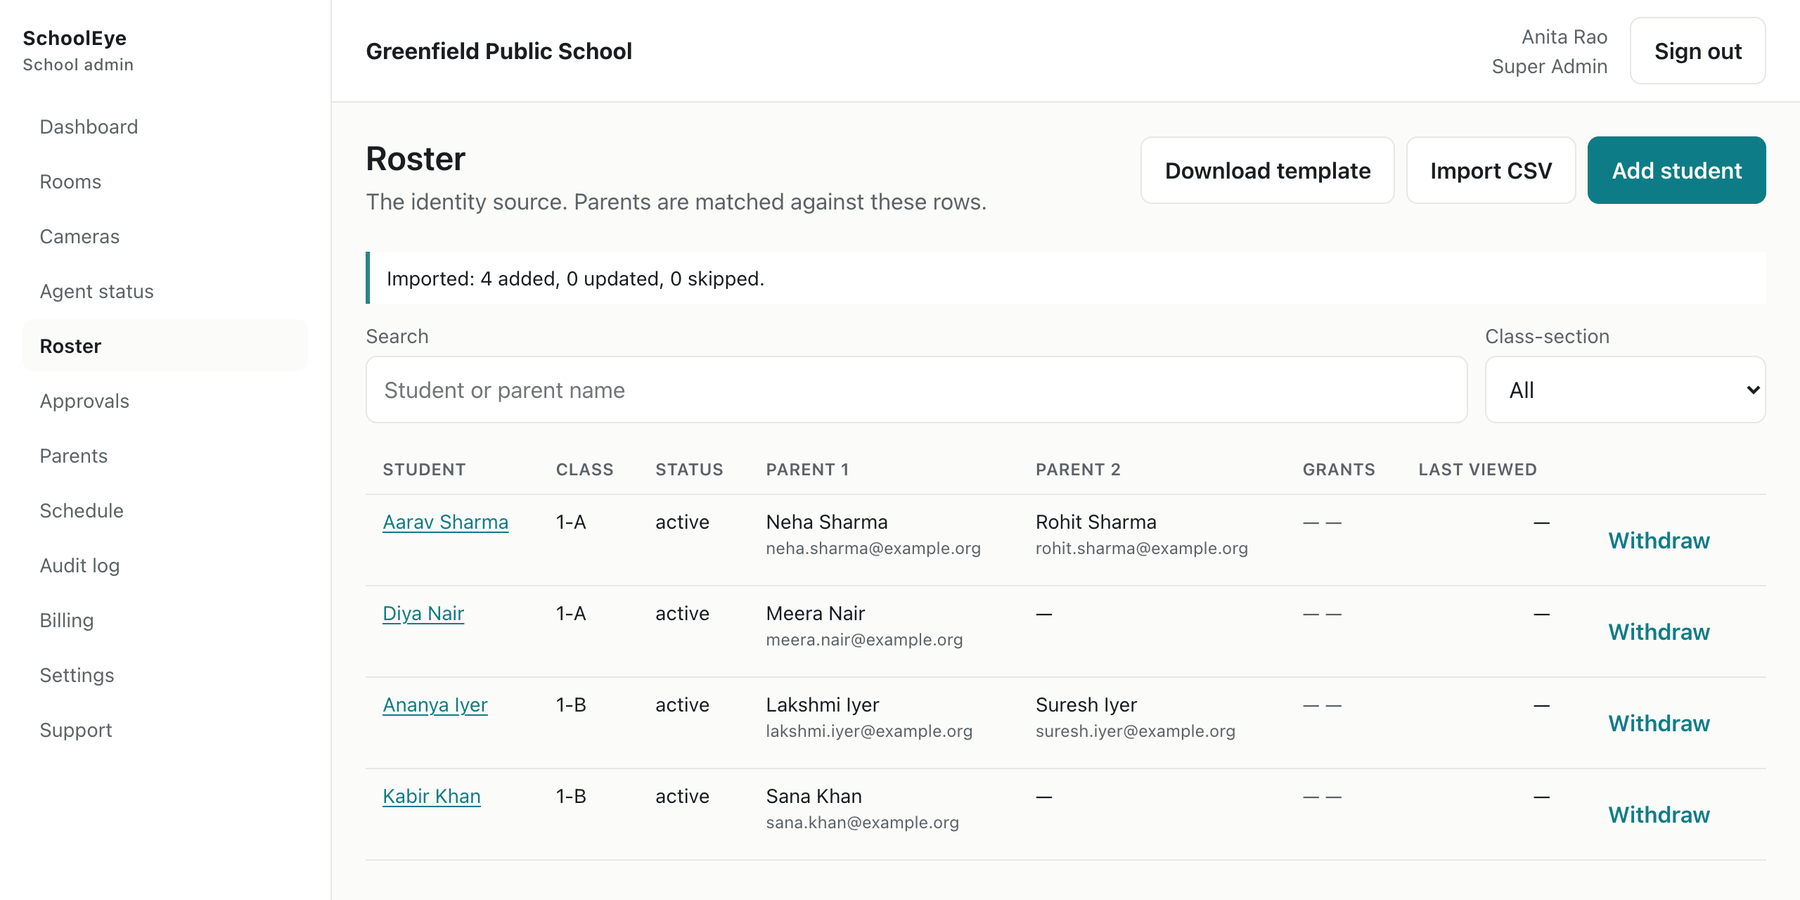
The roster after a successful import
Note: Importing again is safe. Students who are already on the list are updated, not duplicated.
Step 4.3 — Approve near matches
When a parent identifies themselves, SchoolEye compares what they type with your list. An exact match is approved automatically. A near match (for example a spelling difference) waits for you.
In the menu, click Approvals. Each card shows the student, class, parent, where their code would be sent, and how old the request is.
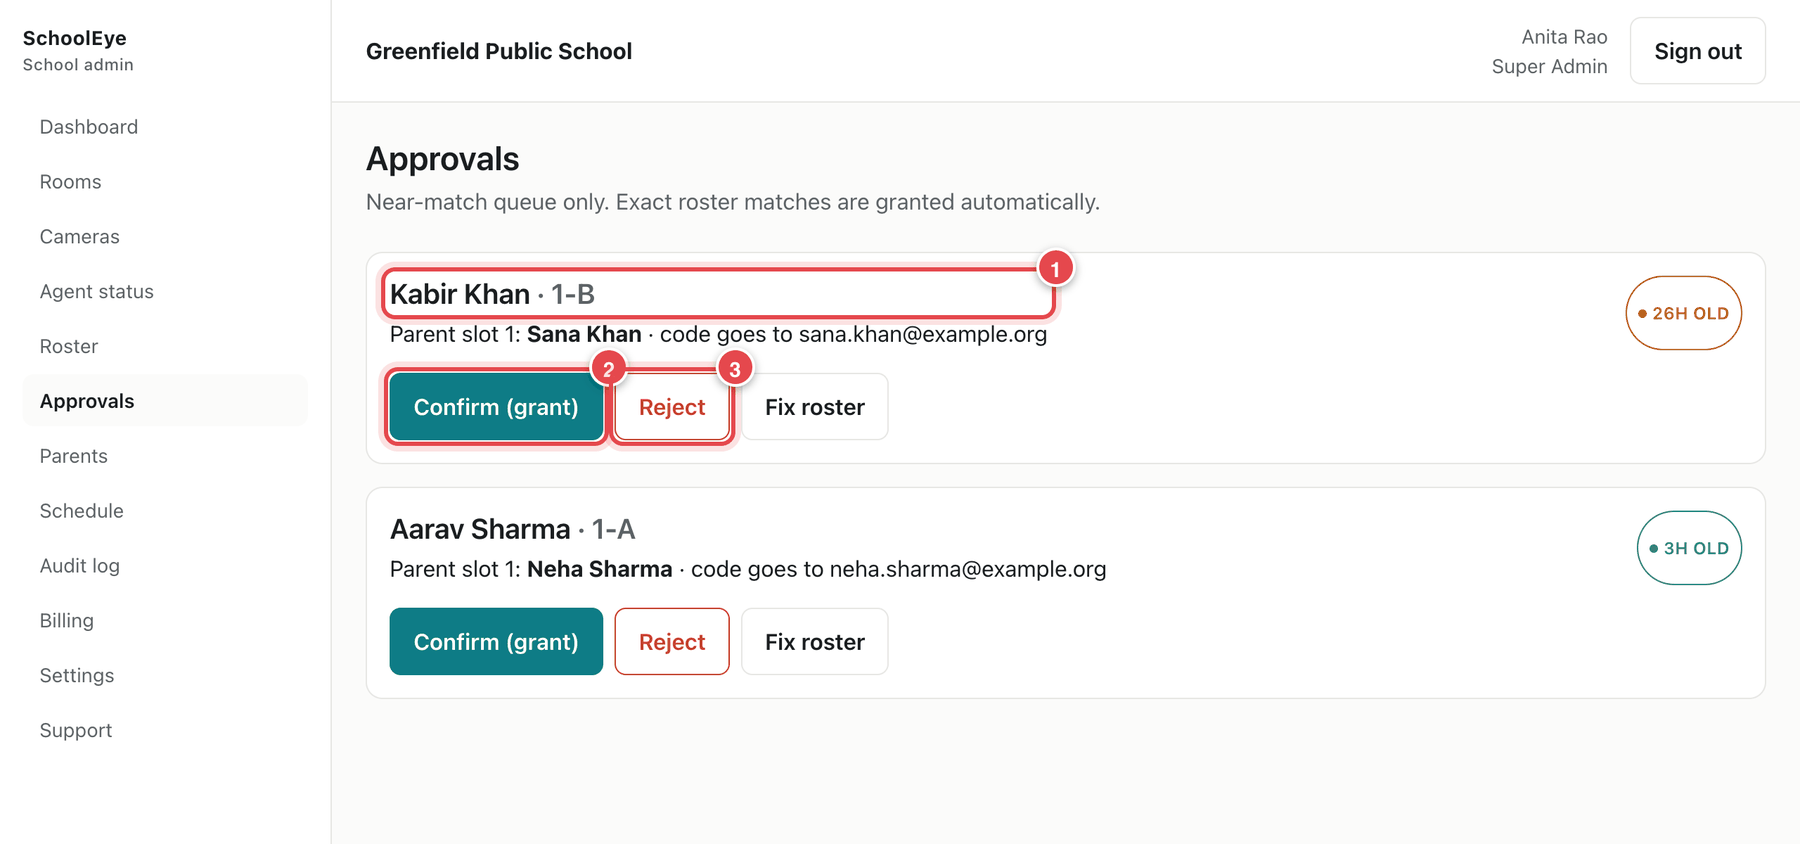
The Approvals page For each card, choose:
- Confirm (grant) 2 — the parent gets access.
- Reject 3 — you will be asked for a short reason.
- Fix roster — correct the spelling on the list instead.
After Confirm you see "Approved — parent can watch on their next visit."
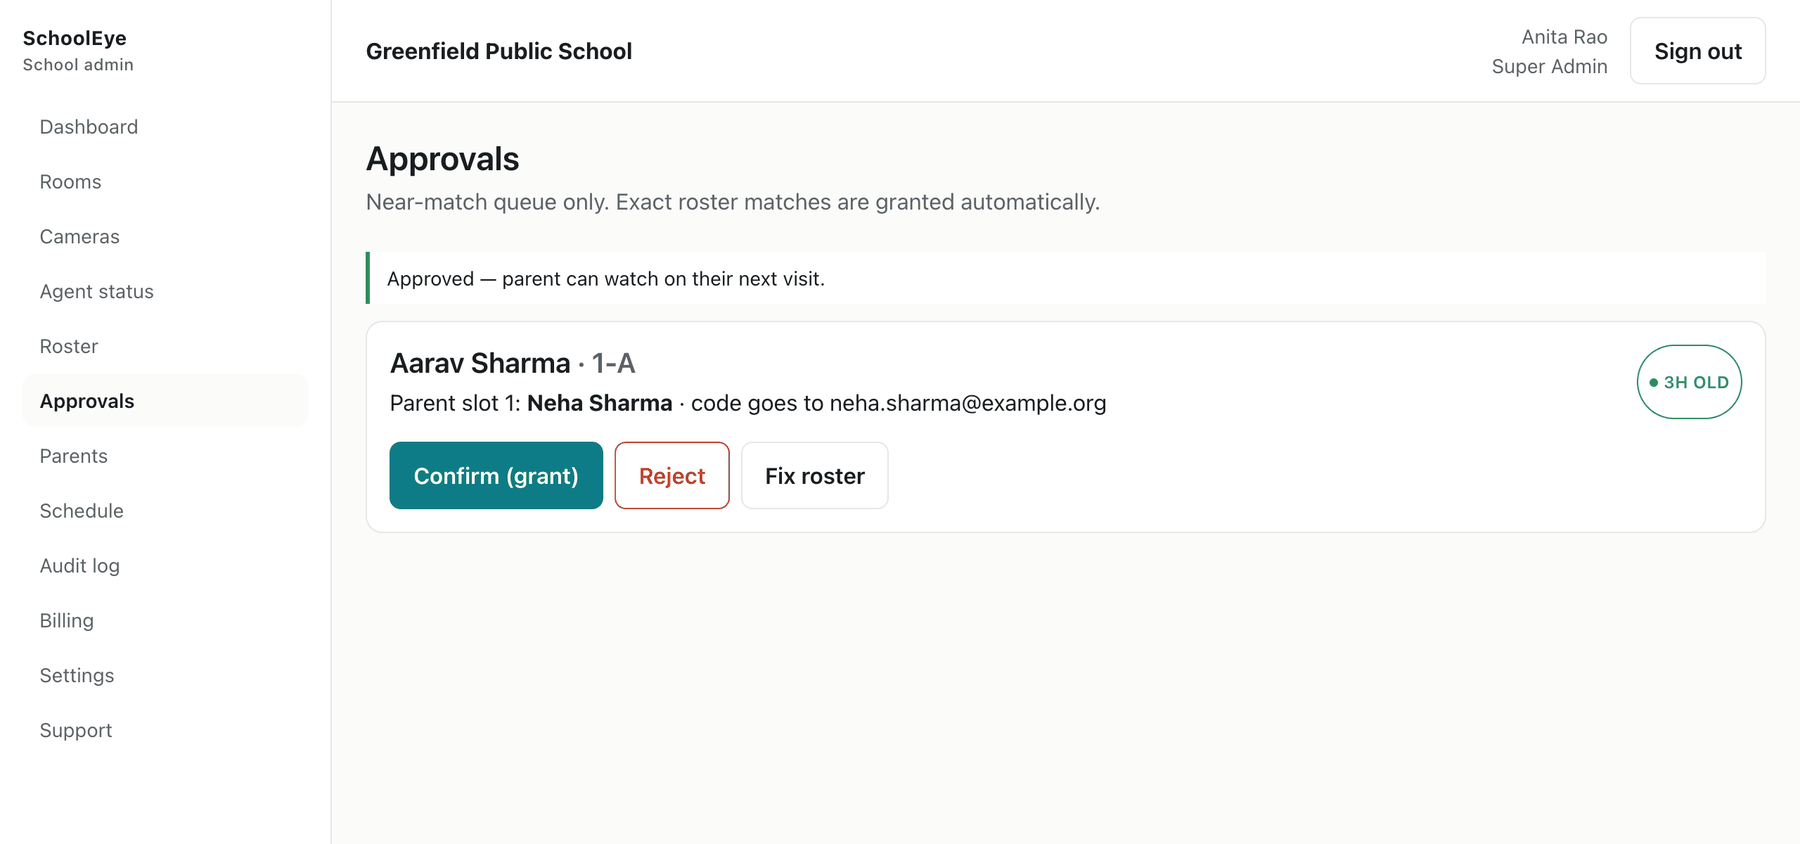
After confirming an approval
Note: Old requests change colour: green under 24 hours, amber under 48 hours, red when overdue. If a card shows a family flag, confirming does not override it.
Part 5 — Set viewing hours and go live
Step 5.1 — Set the viewing hours
In the menu, click Schedule. Each weekday has a row with a start time and an end time 1. Change them to the hours when parents may watch. Click Add window 2 to add another period on the same day (for example after lunch). Saturday and Sunday are closed unless you add a window.
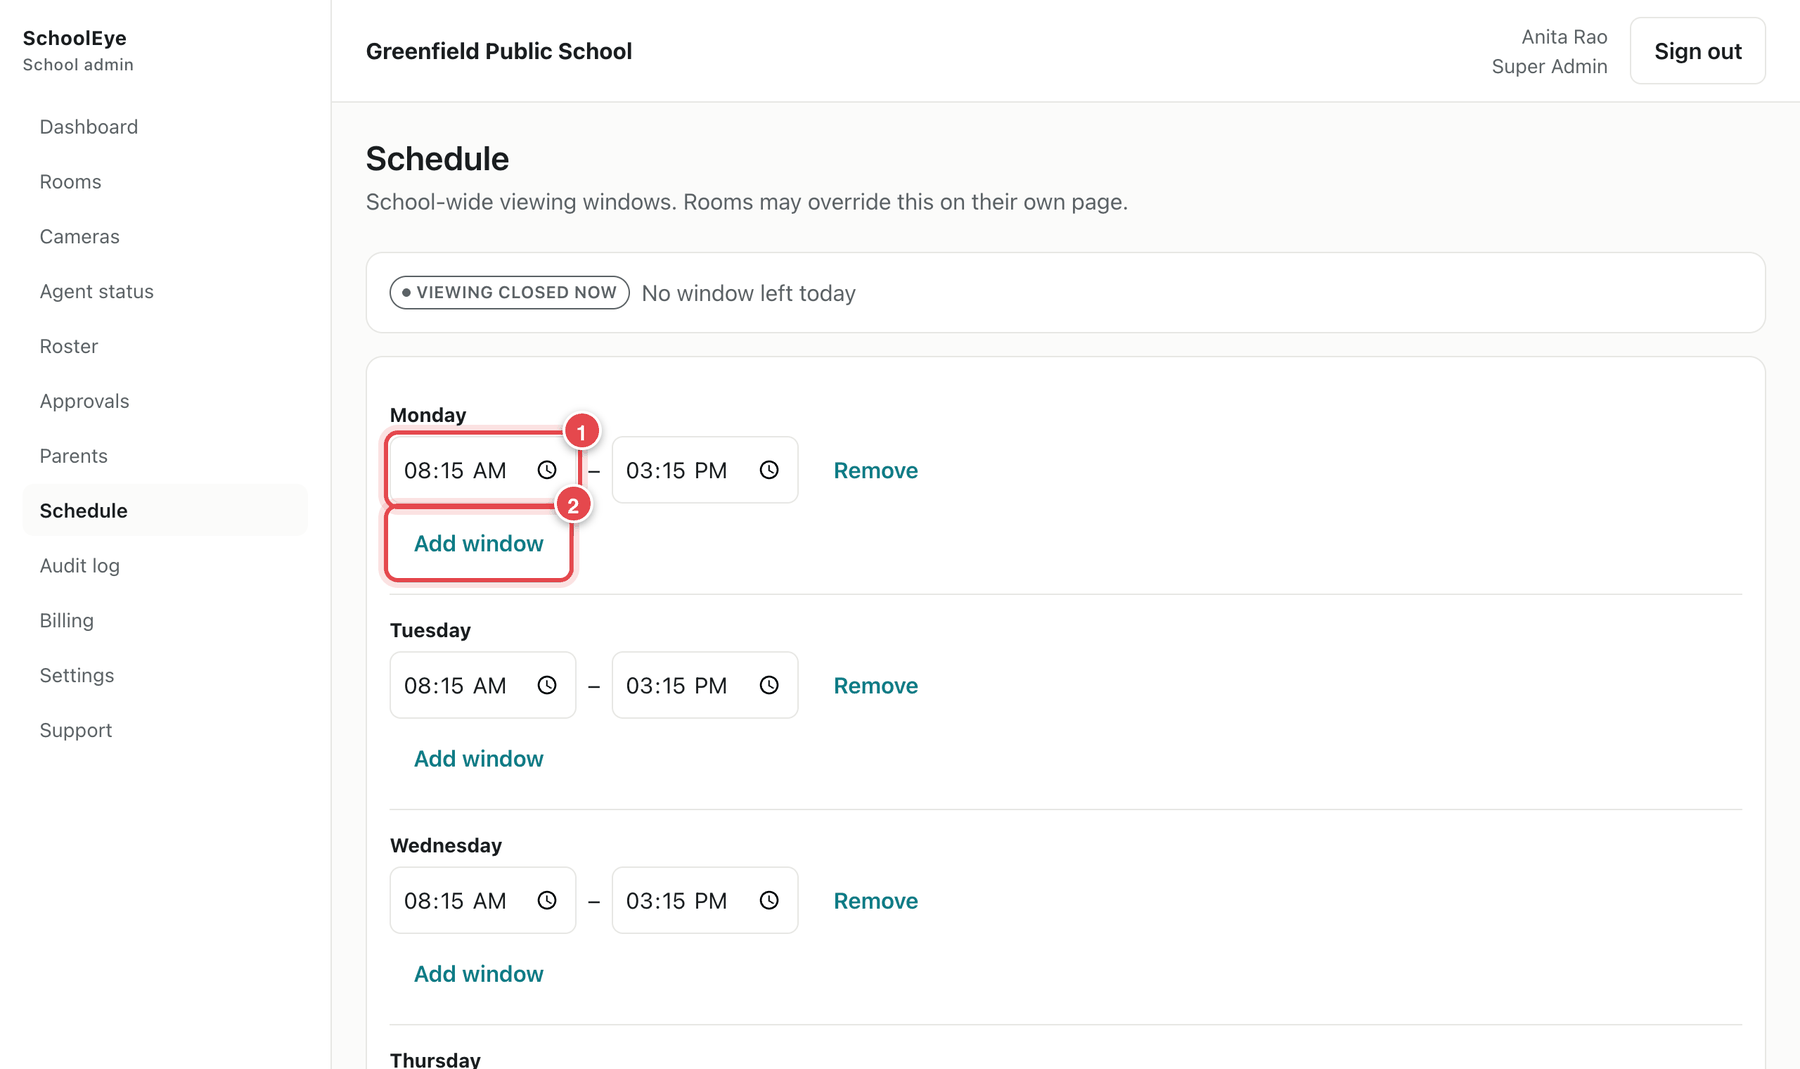
The weekly schedule Scroll down for more options: trim the first and last minutes of every window, add daily exclusions (such as lunch) and date-range closures (holidays, exams). Click Save schedule 3.
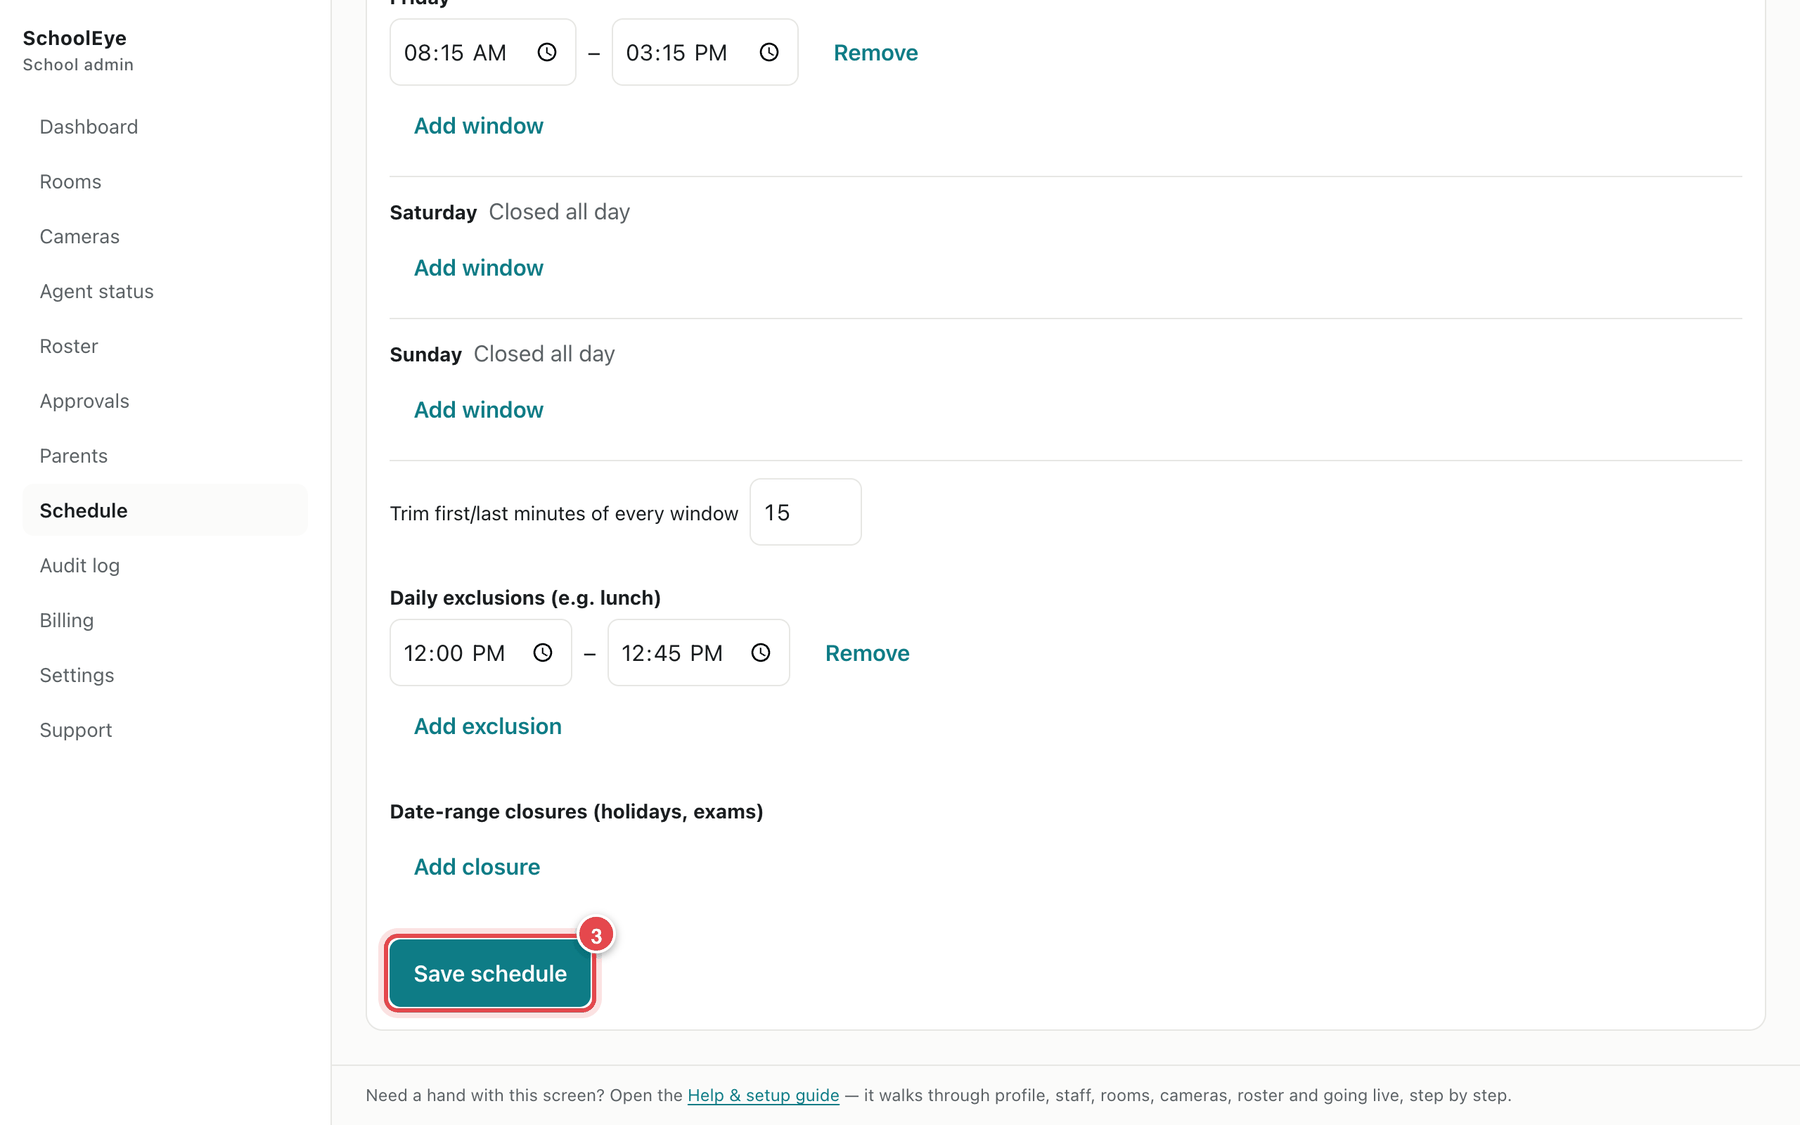
The lower part of the schedule page
The banner at the top always shows whether viewing is open or closed right now.
Tip: A single room can have its own hours. On the room's page, untick Use the school-wide schedule, set the hours and click Save schedule.
Step 5.2 — Turn a room on
A room can go live only when all three are true:
- its type is Classroom or Common area,
- it has a linked camera that is ONLINE (Step 3.4),
- teacher consent is recorded (Step 3.5).
Open the room's page. When everything is in place the Viewing box says All requirements met. Click Enable viewing 1.
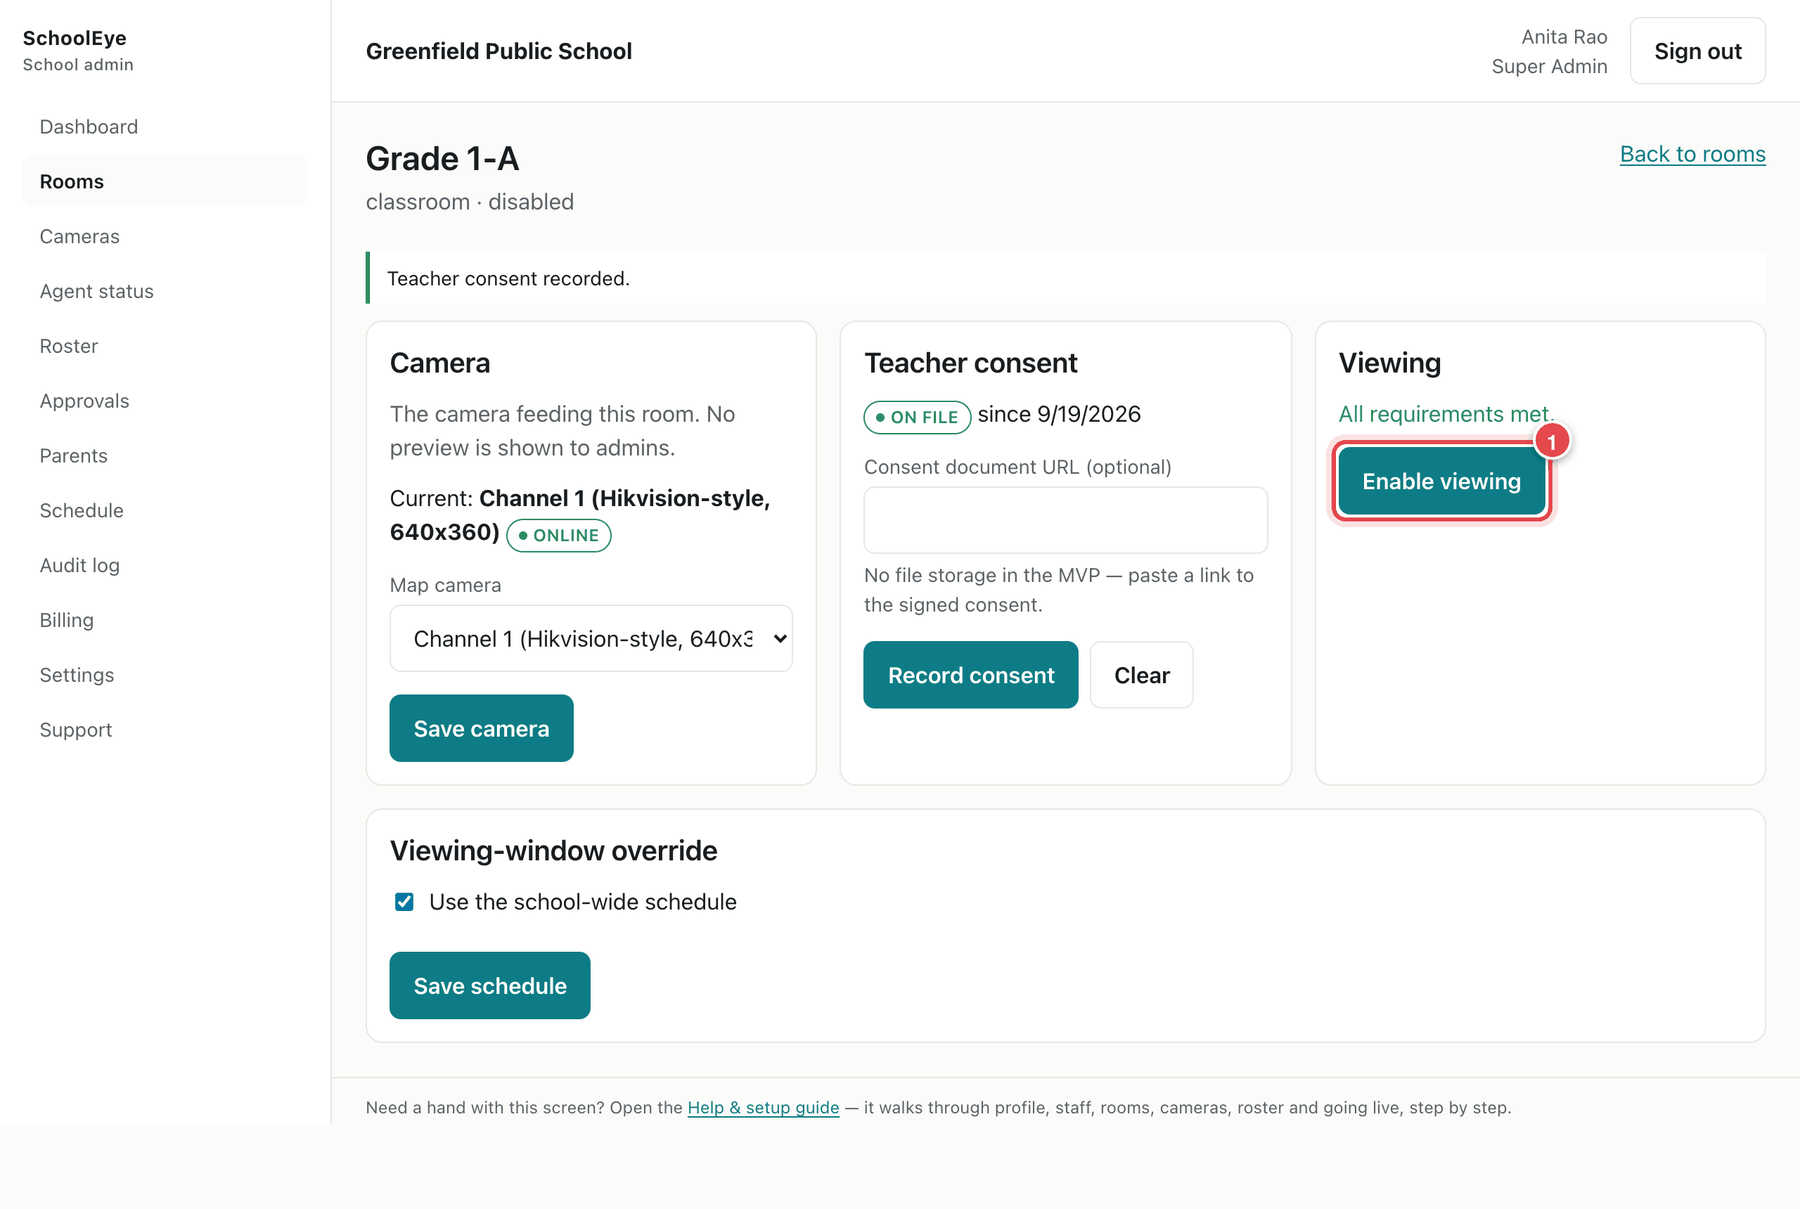
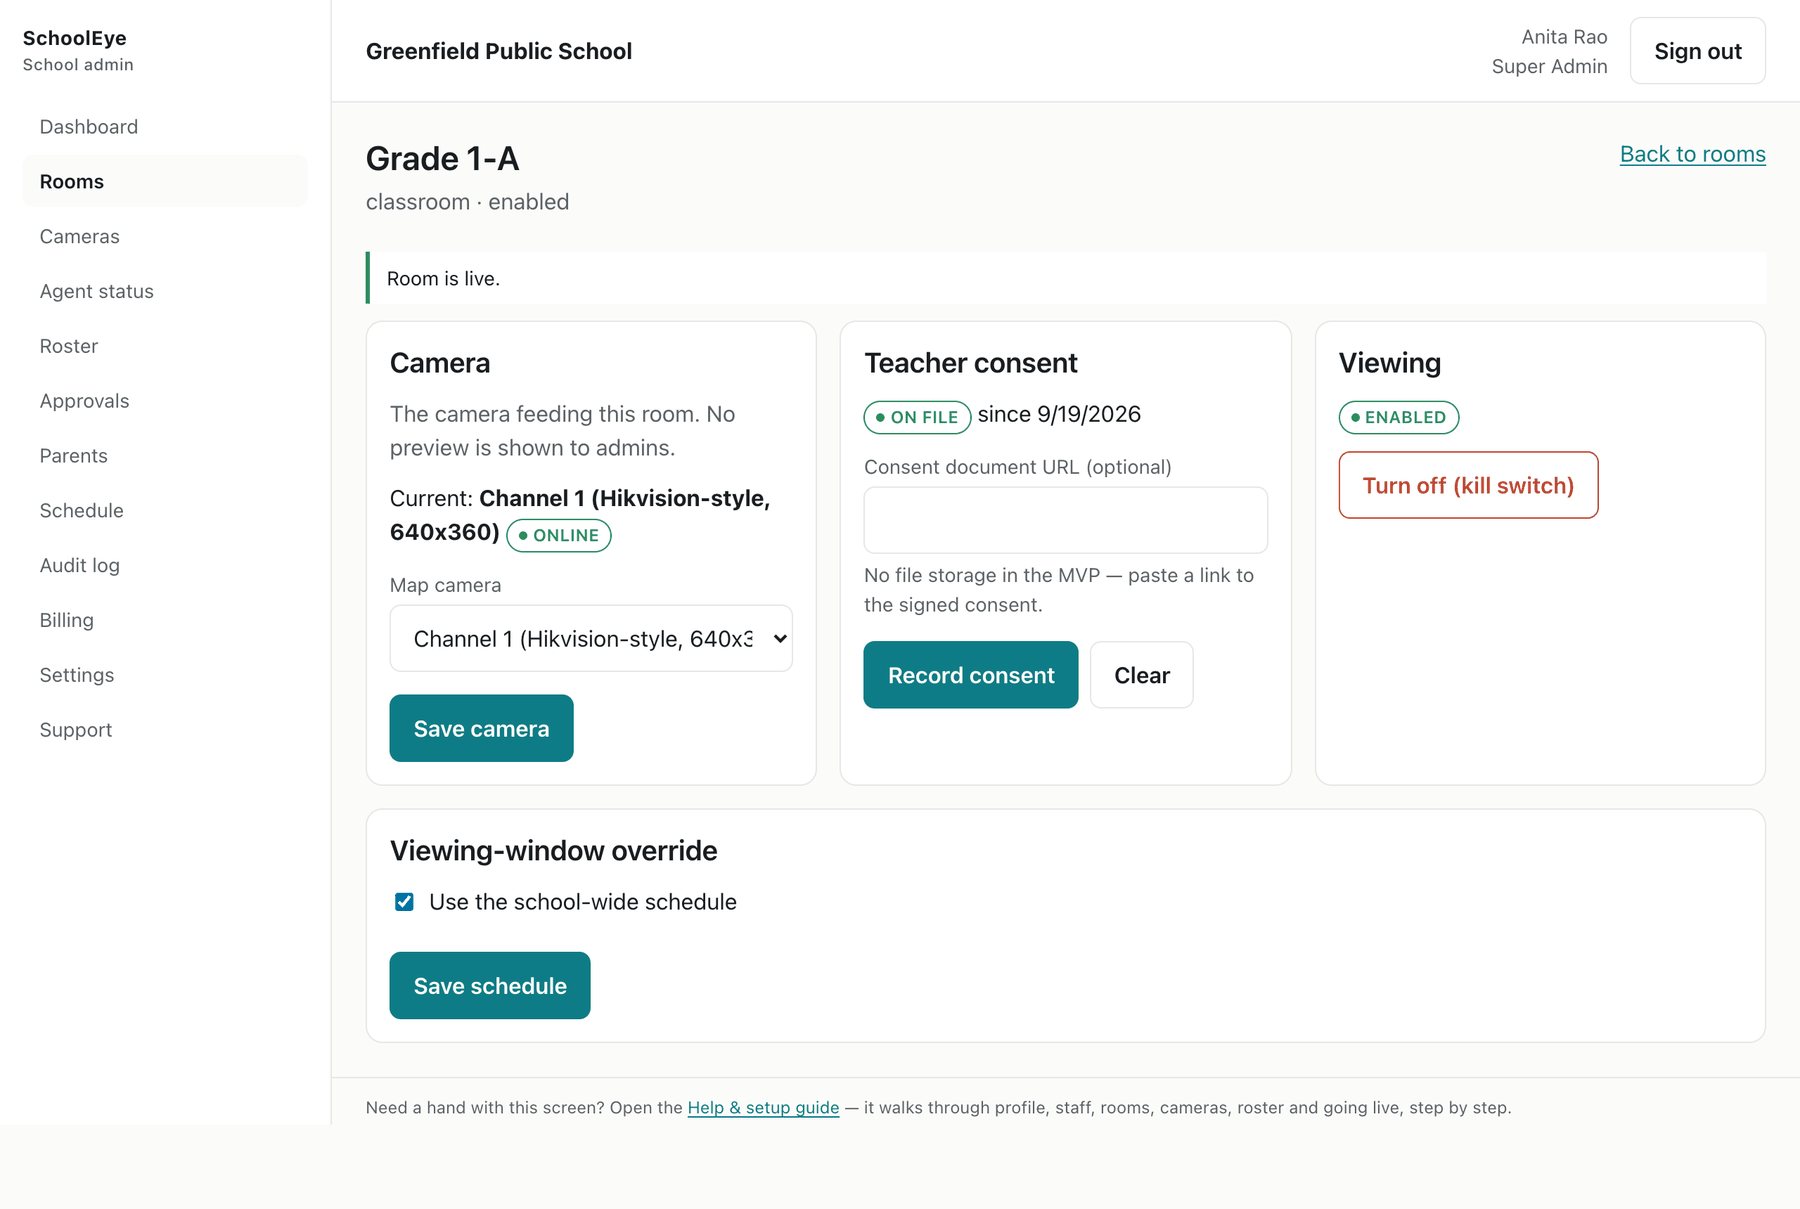
The room is ready to be enabled You will see Room is live. and the Viewing box shows ENABLED.
The room is live In Rooms, the room now shows ON.
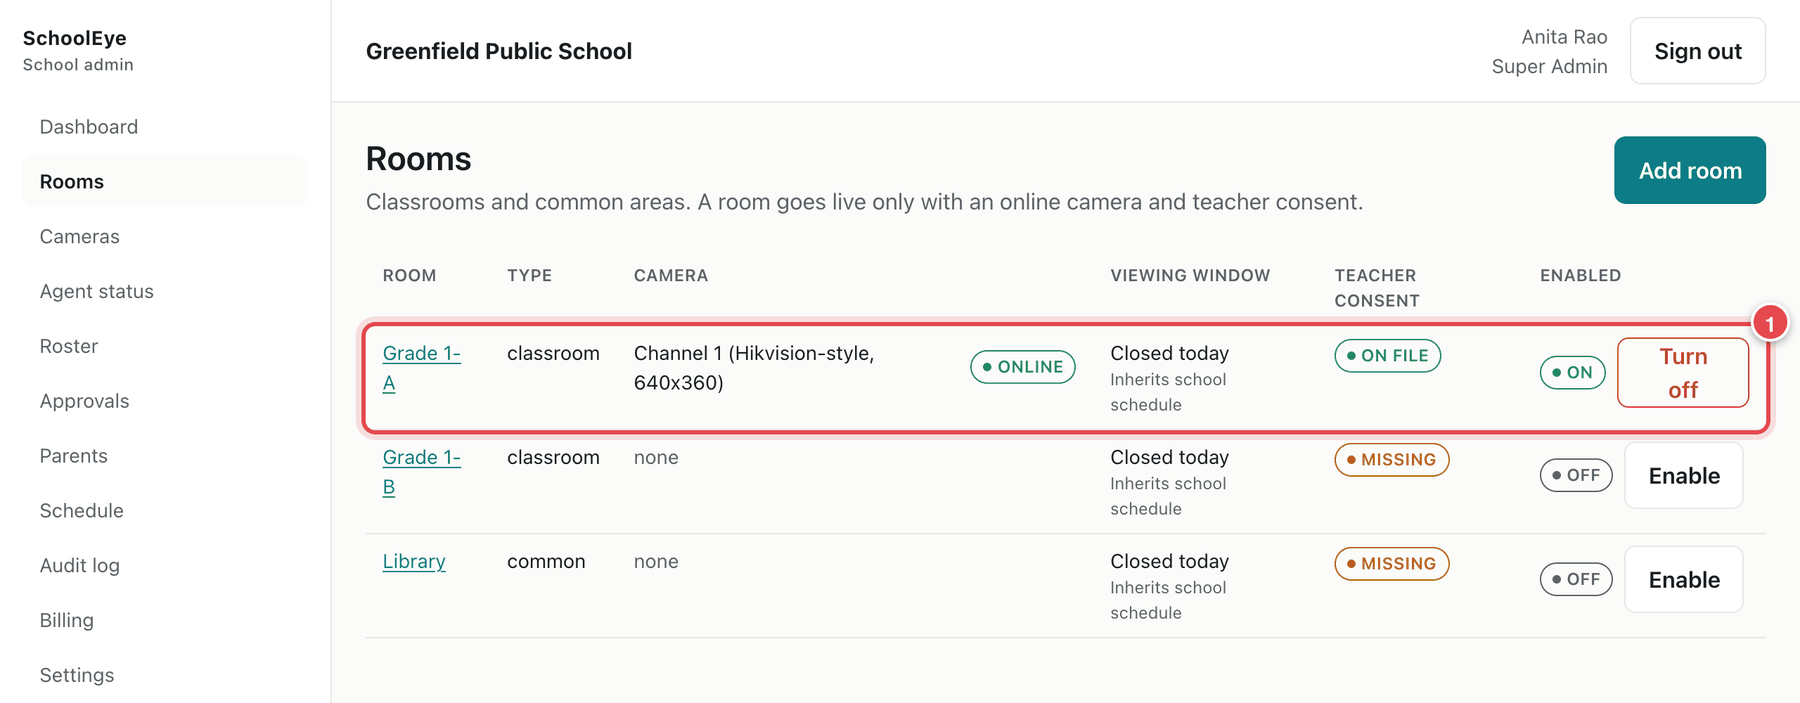
The Rooms list with one room live
Tip: If Enable viewing is greyed out, the Viewing box lists exactly what is still missing.
Step 5.3 — Turn a room off at any time
Open the room and click Turn off (kill switch). You will be asked for a short reason. Parents then see that viewing has been turned off by the school, and anyone watching is disconnected within a few seconds. Turn the room back on with Enable viewing.
Step 5.4 — Tell the parents
Parents do not install anything. Give them these steps (for example in a school circular):
- Open the SchoolEye parent website. SchoolEye will give you the address, and it is also shown at the bottom of the admin sign-in page.
- Choose your school and click Continue.
- Choose your child's class, then type your name and your child's full name exactly as the school has them.
- Click Send me a code. A 6-digit code is sent to the email address or phone number the school has on file. It expires after 10 minutes.
- Type the code. During the school's viewing hours, the live view appears.
Part 6 — Getting help
Contact SchoolEye Support from inside the app
In the menu, click Support.
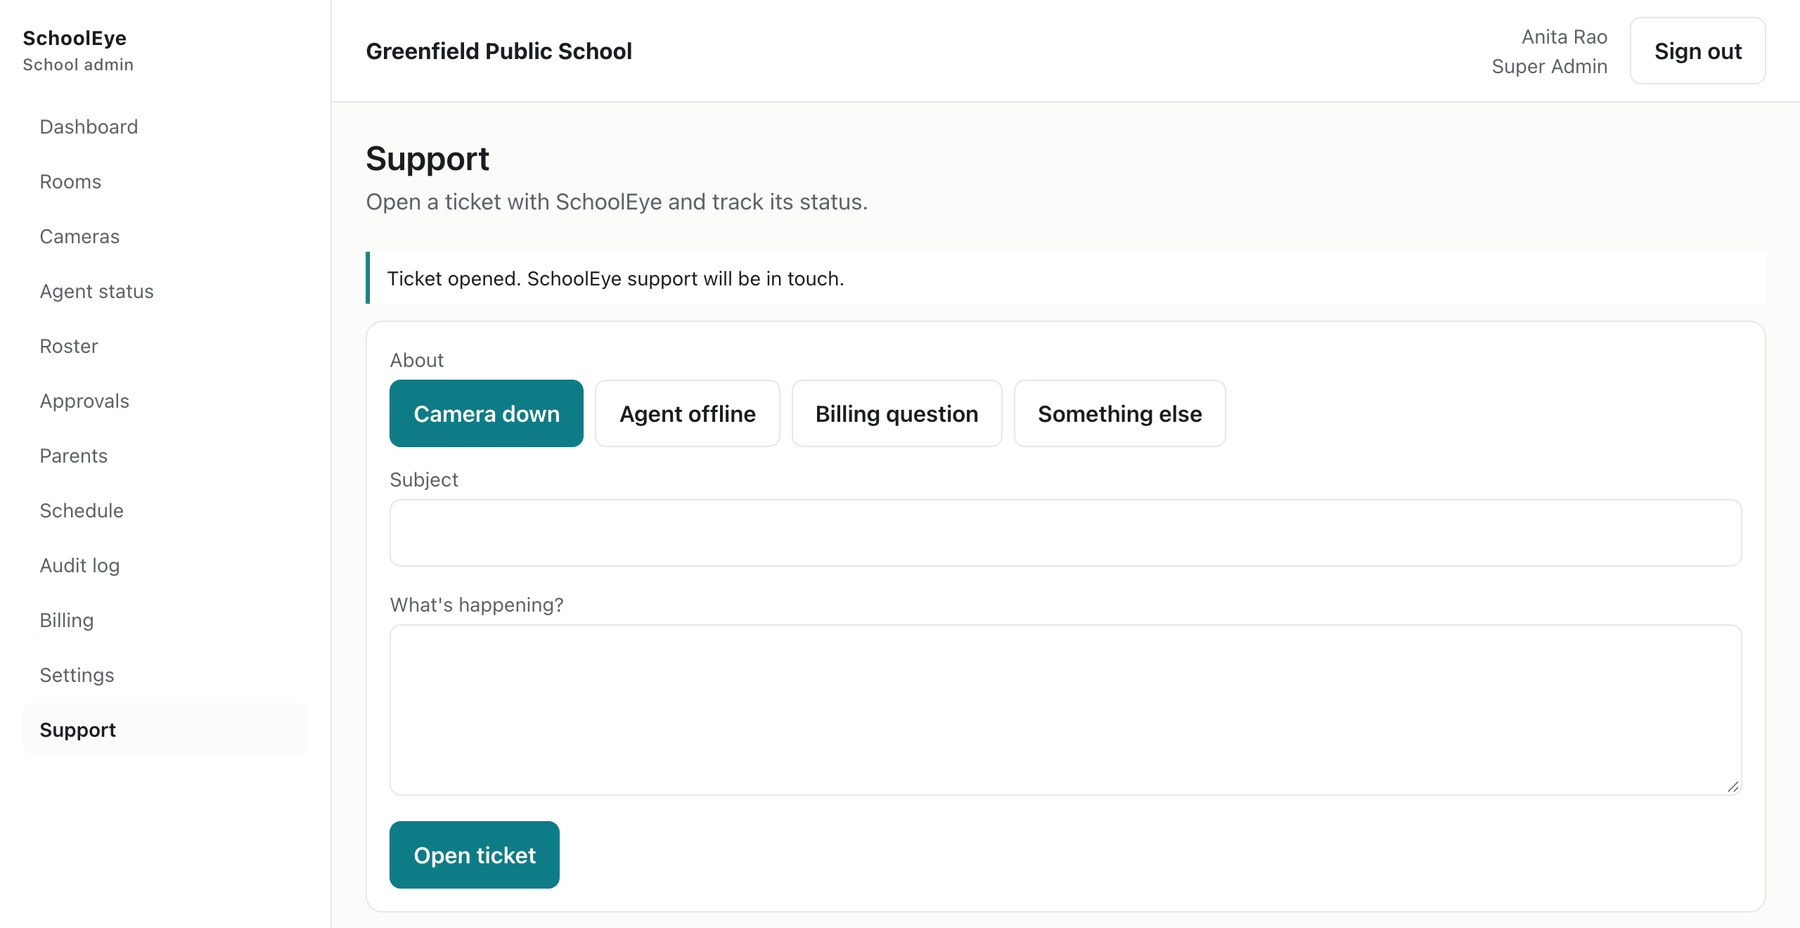
Choose what your question is about 1 (Camera down, Agent offline, Billing question or Something else), type a Subject 2 and describe the problem 3. Click Open ticket 4.
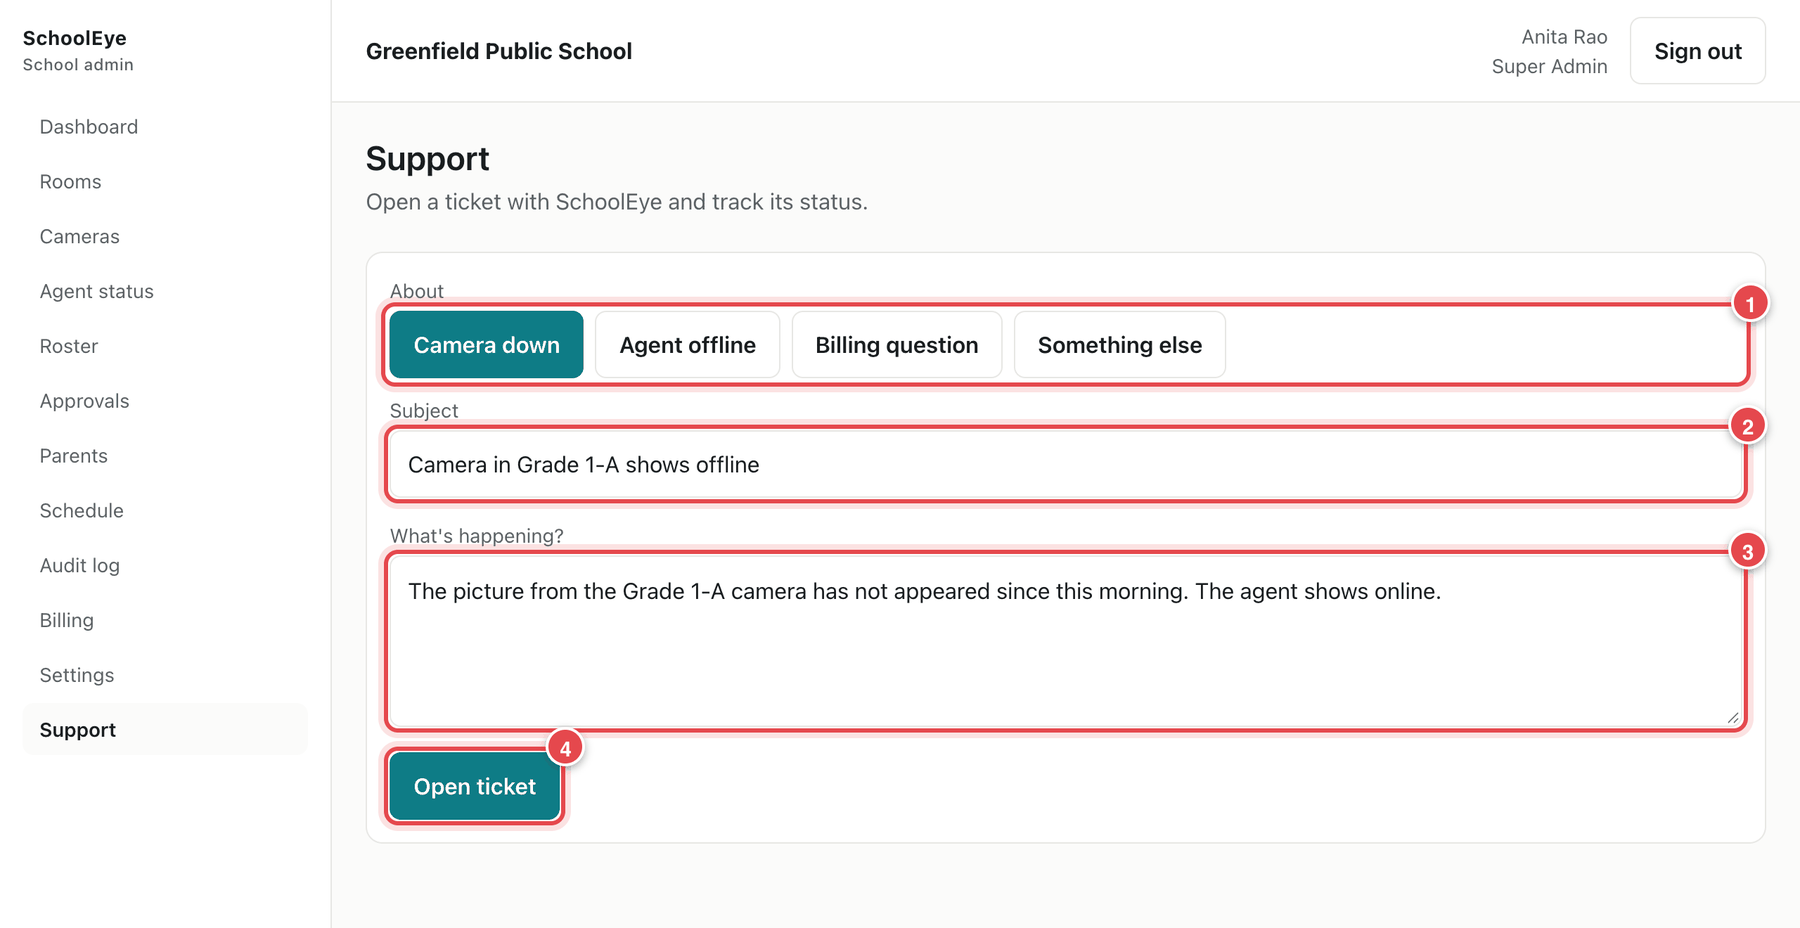
The Support page You will see Ticket opened. SchoolEye support will be in touch. Your tickets and their status are listed on the same page.
Ticket opened
Tip: Say which room or camera it is, what you expected, and what happened instead. A screenshot helps.
Troubleshooting
| Problem | What to do |
|---|---|
| "That email or password is not right." | Check for typing mistakes and extra spaces. Passwords are case-sensitive. If unsure, use Forgot password? (Step 1.6). |
| The 6-digit code is always rejected | Wait for the next code. Set your phone's date and time to automatic. Make sure you added the account with the setup key and chose Other account in Microsoft Authenticator (Step 1.2). |
| I lost my phone | Use a recovery code (Step 1.5), then ask SchoolEye Support to reset your two-step verification. |
| The password reset email does not arrive | Wait a few minutes, check Spam or Junk, confirm the address, then ask your Super Admin or SchoolEye Support. |
| Settings are greyed out | Only a Super Admin can change the school profile and administrators. |
| Rooms, Cameras or Schedule are missing from the menu | Your role is Staff or Viewer. Ask a Super Admin to change your role. |
| The agent does not appear in Agent status, or shows offline | Check the school computer is switched on, awake and online. If the installation never finished, get a new pairing code (Step 3.1) and follow the Agent installation guide again. |
| No cameras are listed | Wait a few minutes after installation. If still empty, contact SchoolEye Support with the recorder details you gave the installer. |
| Enable viewing is not available | Read the list in the Viewing box. Usually the camera is not ONLINE yet, or teacher consent is not recorded. |
| CSV import says "… is not a class-section at this school" | The class name in the spreadsheet does not match Settings exactly. Fix the spreadsheet or the class-sections list (Step 2.1). |
| CSV import says "needs an email address or a phone number" | Add an email or a phone number (with country code) for that parent. |
| A parent says they never got a code | Check their contact details on the roster. Look in Approvals — their name may be a near match waiting for you. |
| A parent sees "Your school is finishing setup for this classroom" | That room is not enabled yet (Step 5.2). |
| A parent sees "viewing is closed" during school hours | Check Schedule for the right hours and for a closure covering today. |
Glossary
| Word | Meaning |
|---|---|
| Agent | The small program installed on a school computer that connects your cameras to SchoolEye. |
| Authenticator app | A phone app that shows a new 6-digit code every 30 seconds. |
| Pairing code | A one-time code that connects the agent to your school. |
| Recovery code | One of ten single-use codes that let you in if you lose your phone. |
| Roster | Your class list: students and their parents' contact details. |
| Room | A classroom or common area that can be shown to parents. |
| Viewing window | The hours when parents may watch. |
| Near match | A parent whose typed name is almost, but not exactly, on your roster. |
| Kill switch | The Turn off button that stops a room at once. |
Go-live checklist
- Signed in, two-step verification set up, recovery codes stored safely
- School profile and class-sections saved
- Rooms added
- Agent online
- Cameras linked to rooms and showing ONLINE
- Teacher consent recorded for every room
- Class list imported with no errors
- Approvals queue checked
- Viewing hours saved
- Rooms turned on
- Parents told how to sign in
SchoolEye Admin — Getting Started Guide · version 1.0 · 19 September 2026. Pictures show a fictional school.