Install the SchoolEye Agent on a school computer so your CCTV cameras can connect to SchoolEye Live.
Document version 1.0 · 19 September 2026 · SchoolEye Agent 0.2 · For: the person installing at the school (school IT, office staff or CCTV installer) · Time needed: about 20 minutes
The SchoolEye Agent is a small program that runs quietly in the background on one Windows computer at the school. It is the bridge between the school's CCTV recorder and SchoolEye Live.
It only makes outgoing connections. No router or firewall changes are normally needed.
It does not store any video on the computer.
It starts by itself whenever the computer starts.
This guide takes you from a downloaded file to a working, connected agent. Follow the steps in order and compare each screen with the picture.
Red numbered circles (123 …) in the pictures match the numbered instructions.
All names, codes and addresses in the pictures are samples. Yours will be different.
Most school computers bought in the last several years qualify.
Always on during school hours
An office PC that is switched off at night is fine as long as it is on when parents watch. A small spare PC is ideal.
On the same network as the CCTV recorder
Plugged in with a network cable is best.
Internet access
An ordinary broadband connection is enough.
Administrator rights
You need to be able to click Yes on the Windows permission prompt.
Things to have with you
You need
Where to get it
The installer package — a file named SchoolEye-Agent-windows-amd64.zip
SchoolEye sends you a download link.
A one-time pairing code
From the school's SchoolEye administrator (Admin guide, Step 3.1). It expires after about 15 minutes, so ask for it just before you start.
The CCTV recorder's IP address (for example 192.168.1.64)
Ask the CCTV installer, or look for a label on the recorder.
A user name and password for the recorder
Ask the CCTV installer. A view-only account is best.
Tip: The recorder details are optional at install time. If you do not have them, you can skip that question and SchoolEye Support can help you add them afterwards. With them, the agent finds the cameras by itself.
Part 1 — Install the agent
Step 1.1 — Get the pairing code
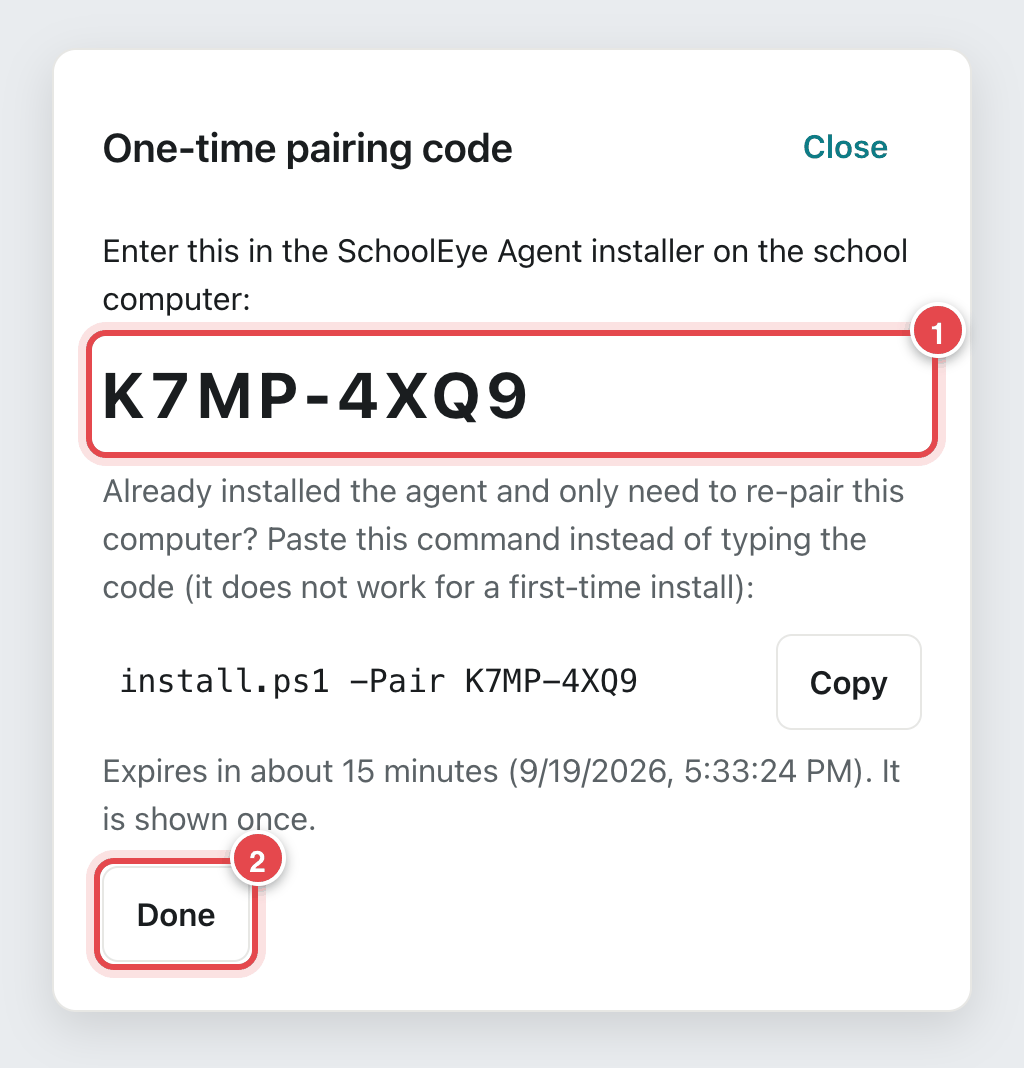
Ask the school's SchoolEye administrator to open Agent status and click Get installer / pair agent1. A window shows the pairing code1.
The pairing code window (a sample code is shown)
Keep this window open, or write the code down exactly as shown, including the hyphen.
Important: The code works once and expires after about 15 minutes. If it runs out, the administrator simply gets a new one.
Step 1.2 — Download and unpack the installer
Download SchoolEye-Agent-windows-amd64.zip from the link SchoolEye gave you. It is saved in your Downloads folder.
Right-click the file and choose Extract All…, then click Extract.
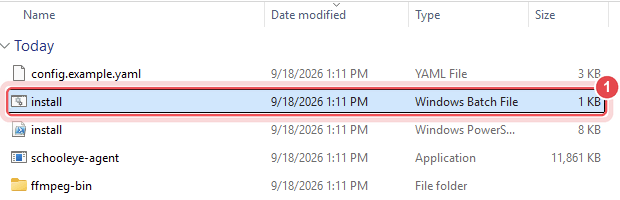
A folder opens. Open the inner folder named windows-amd64. You should see these files:
The unpacked installer folder. 1 is the file to start.
Important: Always extract the zip first. Do not start anything from inside the zipped file.
Step 1.3 — Start the installer
Double-click the file named install whose type is Windows Batch File1. (Do not use the other install file, which is a PowerShell script, and do not double-click schooleye-agent.)
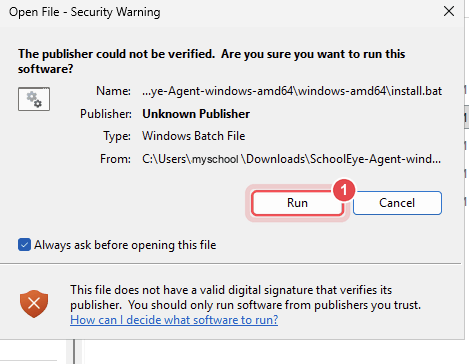
Windows may show an Open File – Security Warning. This is normal for new software. Click Run1.
The Open File - Security Warning
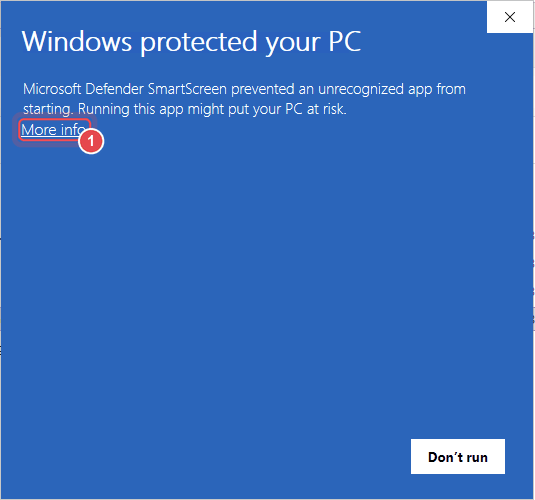
If you see "Windows protected your PC": click More info1, then click Run anyway.
The Windows SmartScreen message
Step 1.4 — Allow administrator access
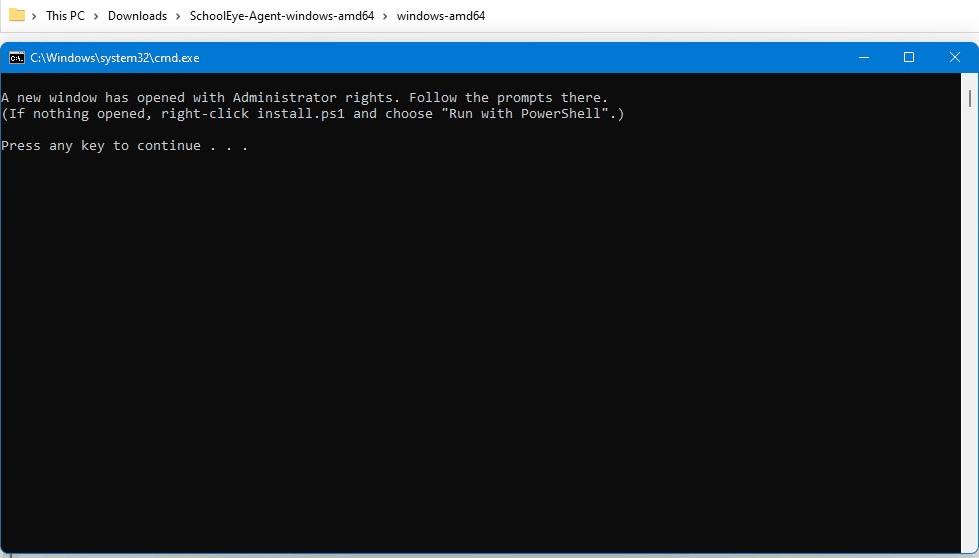
A black window opens and says "A new window has opened with Administrator rights. Follow the prompts there." This is normal.
The black window that opens first
Windows asks "Do you want to allow this app to make changes to your device?" Click Yes.
A second window titled Administrator: Windows PowerShell opens. This is the installer. The black window can stay open in the background — you do not need it.
Tip: If the permission prompt does not appear, look at the taskbar at the bottom of the screen. It may be waiting behind another window.
Step 1.5 — Type the pairing code
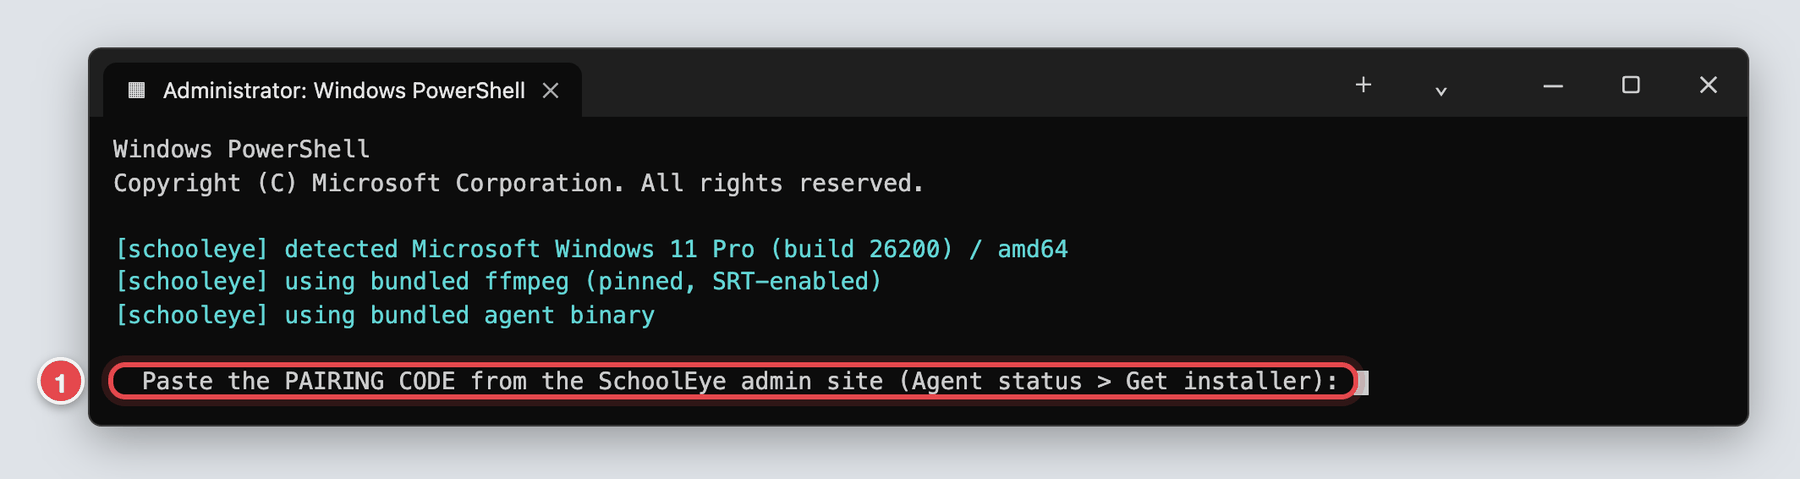
The installer checks the computer, then asks for the pairing code. The last line ends with a blinking cursor 1.
The installer asking for the pairing code
Type the code exactly as shown (capital letters, with the hyphen), for example K7MP-4XQ9.
Press Enter.
Tip: To paste a copied code, press Ctrl + V, or right-click inside the window.
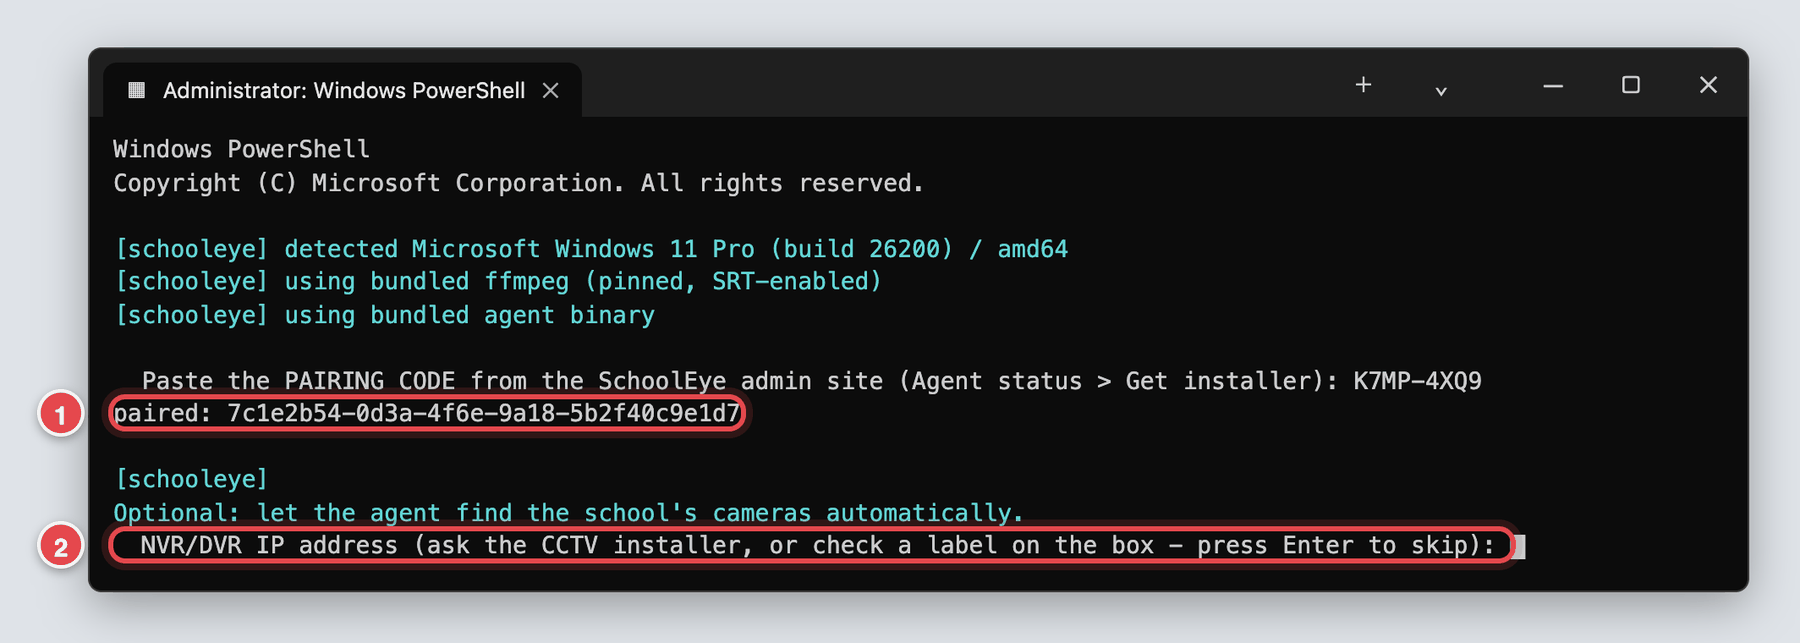
When the code is accepted the installer prints paired: followed by a long number 1. Then it asks about the CCTV recorder 2.
The code was accepted and the recorder question appears
If the installer says "pairing failed": the code was mistyped or has expired. See "Troubleshooting" at the end of this guide.
Step 1.6 — Tell the installer about the CCTV recorder
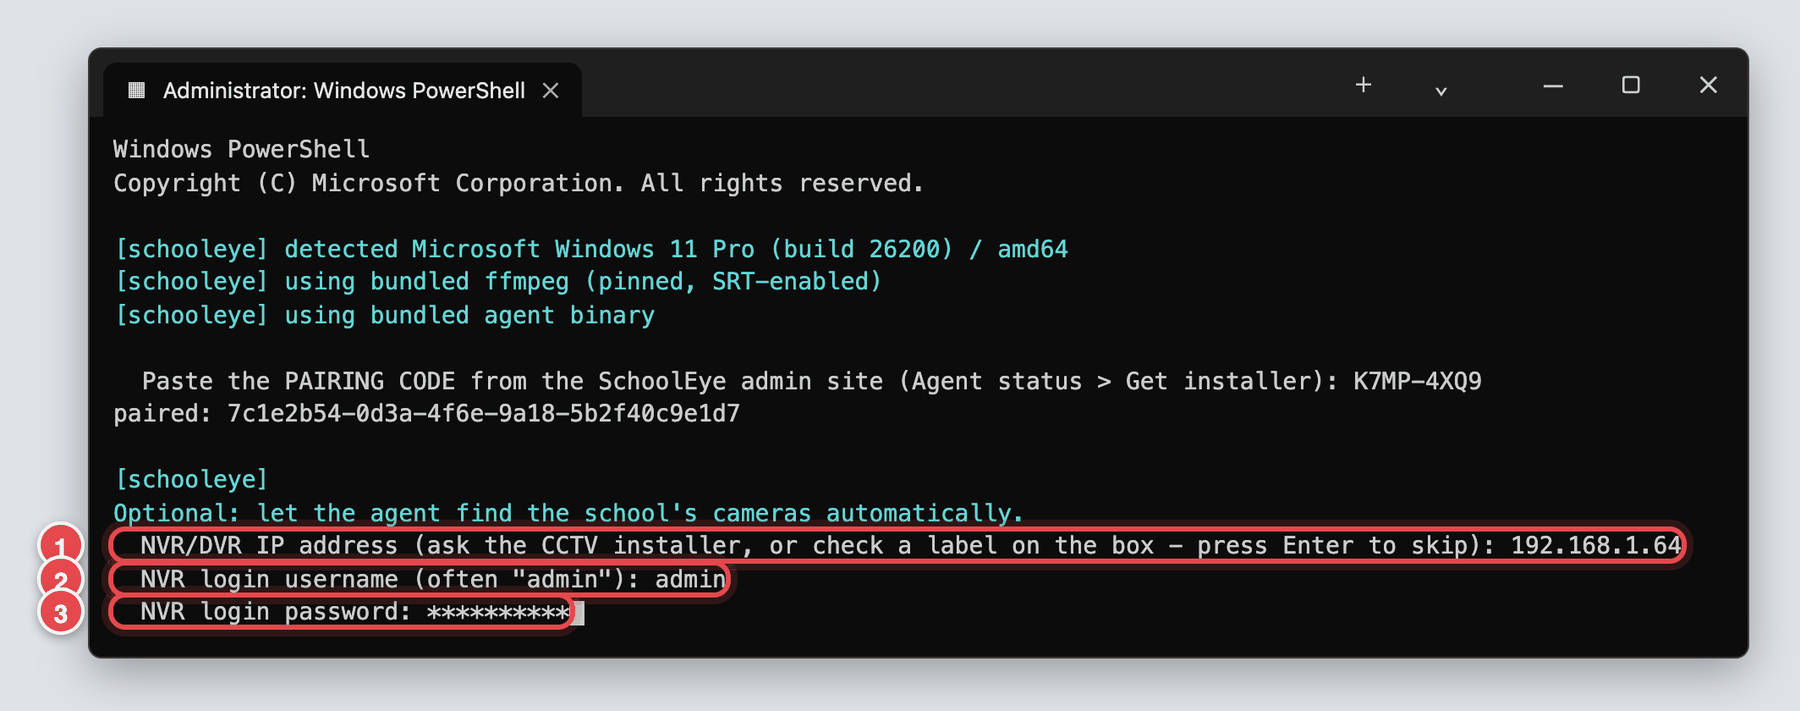
This step lets the agent find the school's cameras by itself. Answer the three questions, pressing Enter after each:
NVR/DVR IP address1 — for example 192.168.1.64.
NVR login username2 — often admin.
NVR login password3 — nothing readable appears as you type; only stars. That is normal.
The three recorder questions answered
No recorder details yet? Just press Enter on the first question to skip. You can add the details later with help from SchoolEye Support.
Step 1.7 — Wait for the installer to finish
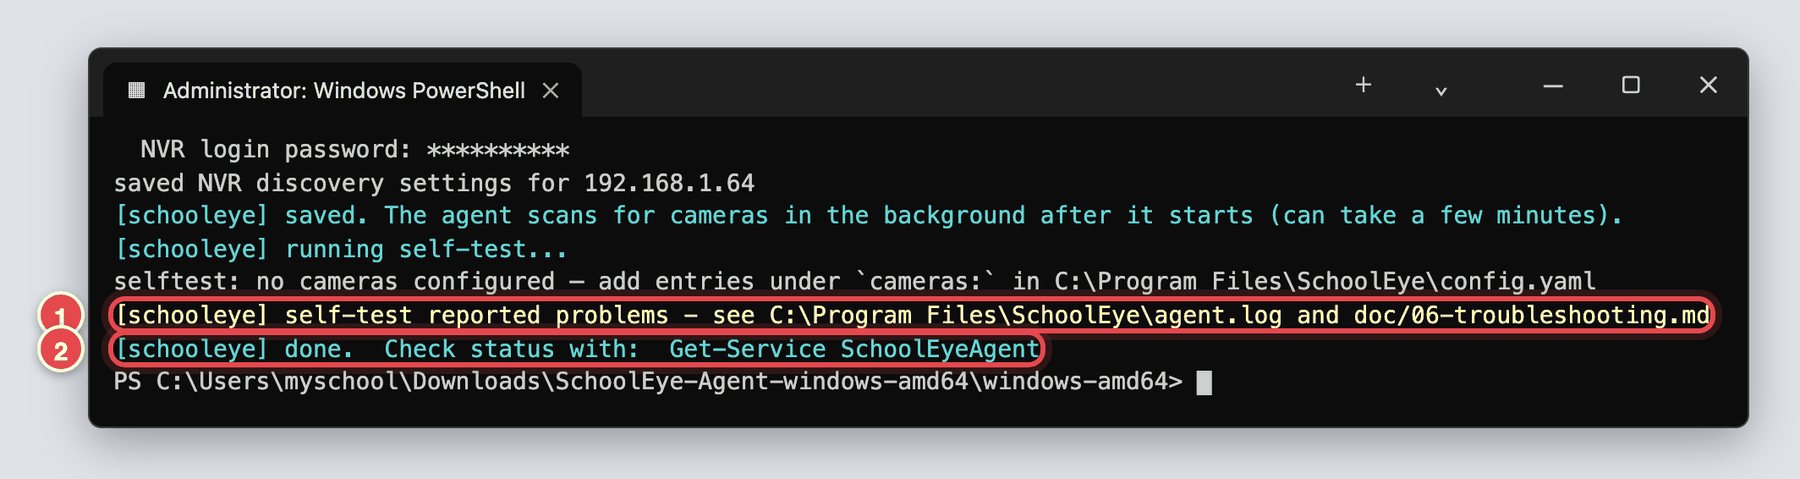
The installer now sets everything up and runs a quick check. When it finishes it shows done2 and a new line beginning with PS C:\…>.
The installer has finished
Note: You may see a yellow line saying "self-test reported problems"1, and a message about cameras configured. This is expected at this point. The agent has just been installed and has not searched for cameras yet. It looks for them by itself over the next few minutes. Check the result in Part 2.
You can now close the Administrator: Windows PowerShell window. The agent keeps running in the background.
Part 2 — Check that it works
Step 2.1 — Check on the SchoolEye admin website
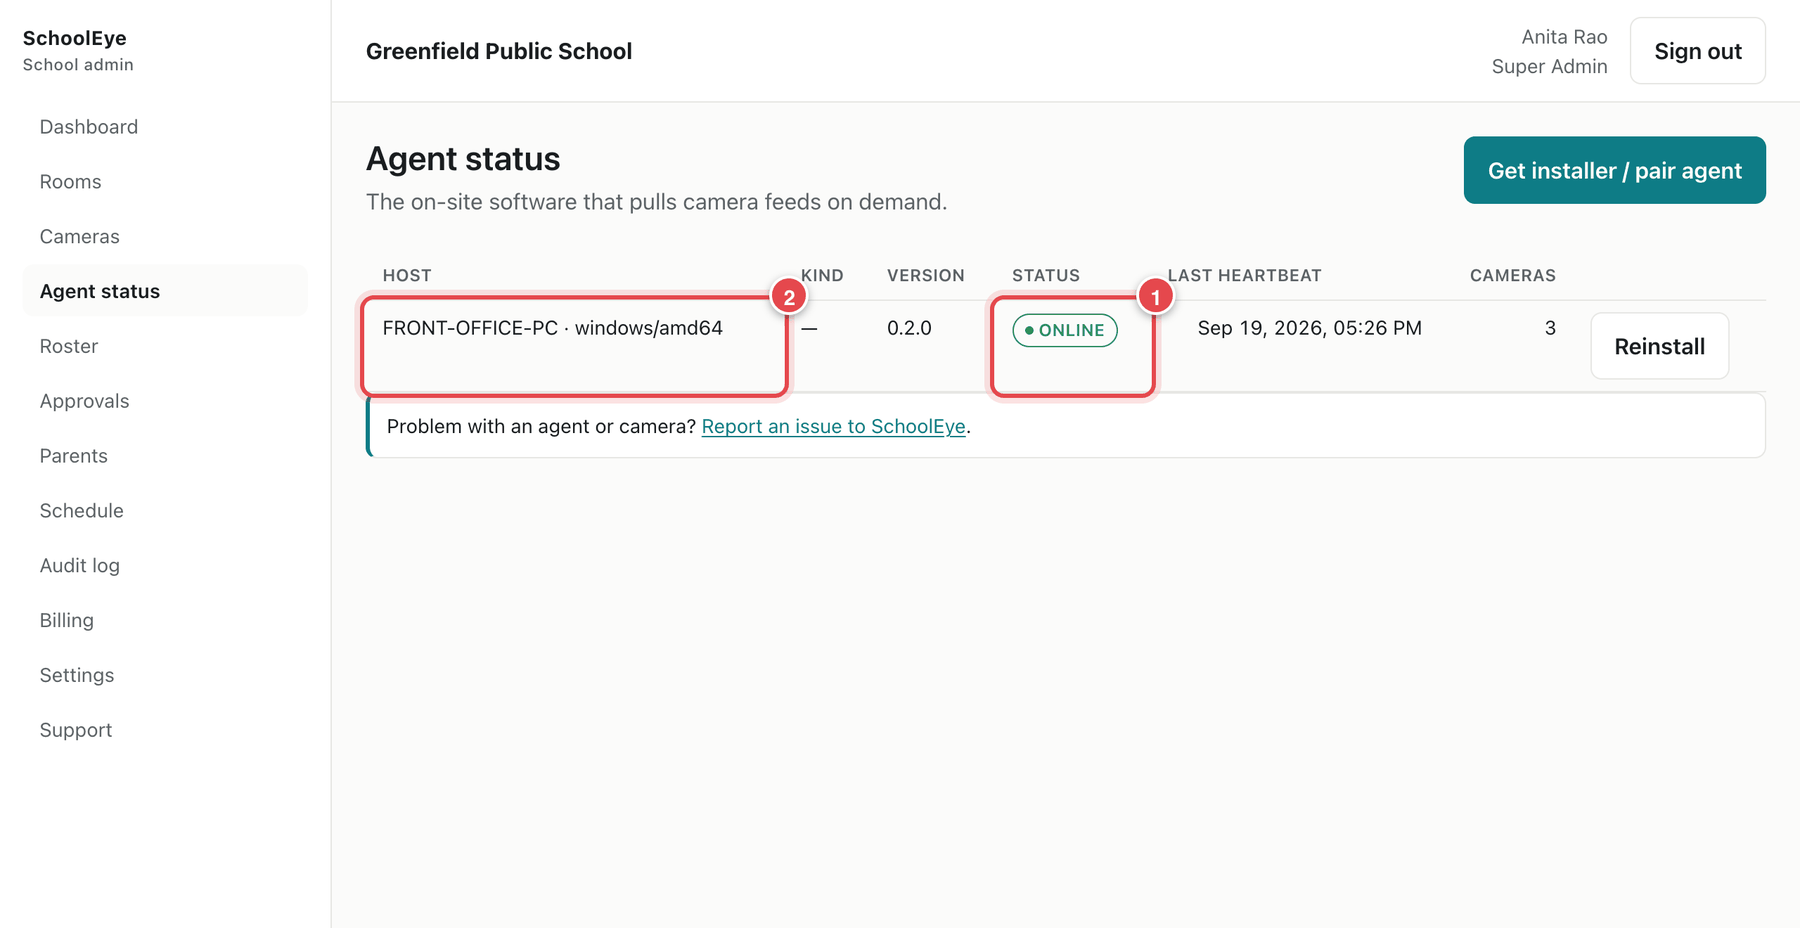
Ask the school's administrator to open Agent status in SchoolEye. Within a minute or two the school computer appears with the status ONLINE1, and the number of cameras it found 2.
Agent status showing the school computer online
Then, in Cameras, each camera the recorder offers appears as Channel 1, Channel 2 and so on. Finding them can take a few minutes. The administrator then links each camera to a room (Admin guide, Steps 3.3 and 3.4).
Step 2.2 — (Optional) Check on the school computer
Click the Start button, type PowerShell, and open Windows PowerShell.
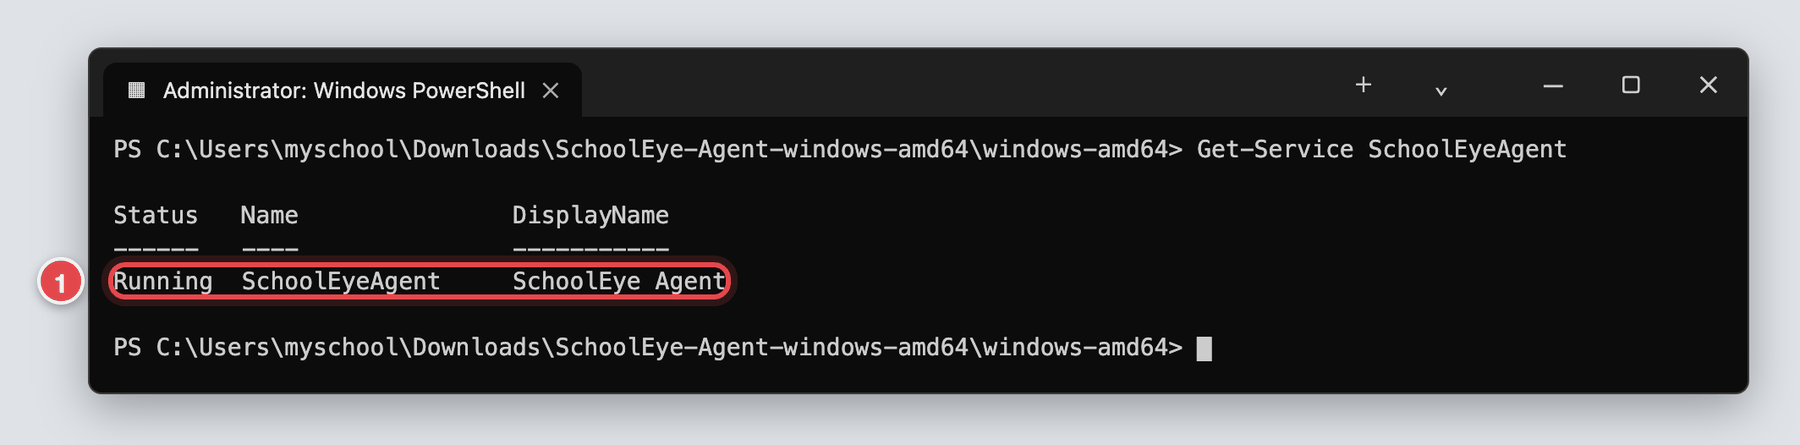
Type Get-Service SchoolEyeAgent and press Enter. The line should say Running1.
The agent service is running
Step 2.3 — Keep the computer awake
The agent works only while the computer is on and awake. Switching the screen off is fine; sleeping or shutting down stops the agent (it starts again by itself after a restart). Set the computer to stay awake during school hours:
Open Settings → System → Power & battery (Windows 11) or Settings → System → Power & sleep (Windows 10).
Under Screen and sleep, set When plugged in, put my device to sleep after to Never.
Part 3 — Later changes
Most schools never need these. If unsure, ask SchoolEye Support.
Update to a newer version
Download the newer package and install it the same way (Steps 1.2 to 1.4). The installer detects that the computer is already connected, so you will not need a new pairing code.
Connect the agent again (new pairing code)
Use this if SchoolEye Support asks you to connect the agent again, for example after the computer was replaced.
The administrator gets a new code (Admin guide, Step 3.1).
Click Start, type PowerShell, right-click Windows PowerShell and choose Run as administrator. Click Yes.
In File Explorer, right-click the windows-amd64 folder and choose Copy as path. In the PowerShell window type cd and a space, right-click to paste the path, and press Enter.
Type the following, replacing the sample code with the new one, and press Enter:
This stops the agent and removes its files. The school's data in SchoolEye is not affected.
Part 4 — Troubleshooting
What you see
What to do
"Windows protected your PC"
Click More info, then Run anyway (Step 1.3).
Nothing happens after double-clicking, or only the black window appears
Look for the Windows permission prompt (it may be behind other windows or flashing on the taskbar) and click Yes. If it never appears, right-click install (Windows Batch File) and choose Run as administrator.
The window closes by itself
Extract the zip first (Step 1.2) and start install from the extracted folder.
"pairing failed (bad or expired code?)"
The code was typed wrongly or has expired. Ask the administrator for a new code and run install again.
Cannot paste the code
Press Ctrl + V, or right-click inside the window. If that fails, type the code by hand.
A yellow "self-test reported problems" line at the end
Expected on a new installation (Step 1.7). Go to Part 2 to check.
The agent shows offline in SchoolEye
The computer is off, asleep or has no internet. Wake it, check the internet, and check again after a minute.
The agent is ONLINE but no cameras appear after 10 minutes
The recorder details may be wrong, or the computer is on a different network from the recorder. Check with the CCTV installer, then contact SchoolEye Support.
The installer says it could not obtain a required component
The package was not fully extracted. Delete the extracted folder, extract the zip again with Extract All…, and retry.
Getting help
Contact SchoolEye Support through Support in the admin website, or through your SchoolEye contact. Please tell us:
your school's name and what you were doing when the problem happened,
what the screen said (a photo or screenshot helps),
for installation problems, the file agent.log in the folder C:\Program Files\SchoolEye, if it exists.
Installation checklist
Computer is Windows 10 or 11, always on during school hours and on the recorder's network
Pairing code obtained from the administrator (less than 15 minutes old)
Recorder IP address, user name and password to hand (optional)
Zip extracted; install (Windows Batch File) started
Permission prompt accepted with Yes
Pairing code entered — paired shown
Recorder details entered (or skipped)
Installer finished — done shown
Agent shows ONLINE in SchoolEye
Cameras listed in SchoolEye
Computer set to never sleep
SchoolEye Agent for Windows — Installation Guide · version 1.0 · 19 September 2026. Pictures show sample values.